Showing posts with label grill. Show all posts

Wednesday, June 21, 2017

Grilled Pineapple & Watermelon Salad

I do love to grill and to me, there is nothing tastier than grilled fruit.

With pineapples and watermelon in season, I figured why not? 

Watermelon firms up over the flames and gains a mellow flavor. The pineapple becomes caramelized and even juicier.

The result was so tasty I ate nearly half the bowl myself. This smoky sweet side dish is a great partner to some spicy blackened grilled chicken. 

The next time you fire up the grill, give this a try.

Mangia! Mangia!
Andrea


Grilled Pineapple & Watermelon Salad

1/4 cup olive oil 
1 small pineapple, outer skin removed, cored and quartered
5 thick watermelon slices, cut from 1/4 of a large melon
1 bunch green onions, trimmed
1-2 teaspoons fresh basil, chopped

Heat grill to medium. Brush both sides of each piece of fruit with olive oil. Brush green onions, too.

Place each piece of pineapple and watermelon on grill. Place onions perpendicular to the grill grates.

Cook for 2 minutes or until nice char marks appear. Remove green onions and set aside to cool. Lower heat if fruit starts to burn. 


Turn over fruit and cook for 2 to 3 minutes more. 

Remove fruit and let cool until you can handle it. Cut off watermelon rind. Dice watermelon, pineapple and green onions into bite-sized pieces. 

Toss fruit and onions in medium bowl. Sprinkle with fresh basil. Serve warm or cold.


Friday, July 8, 2016

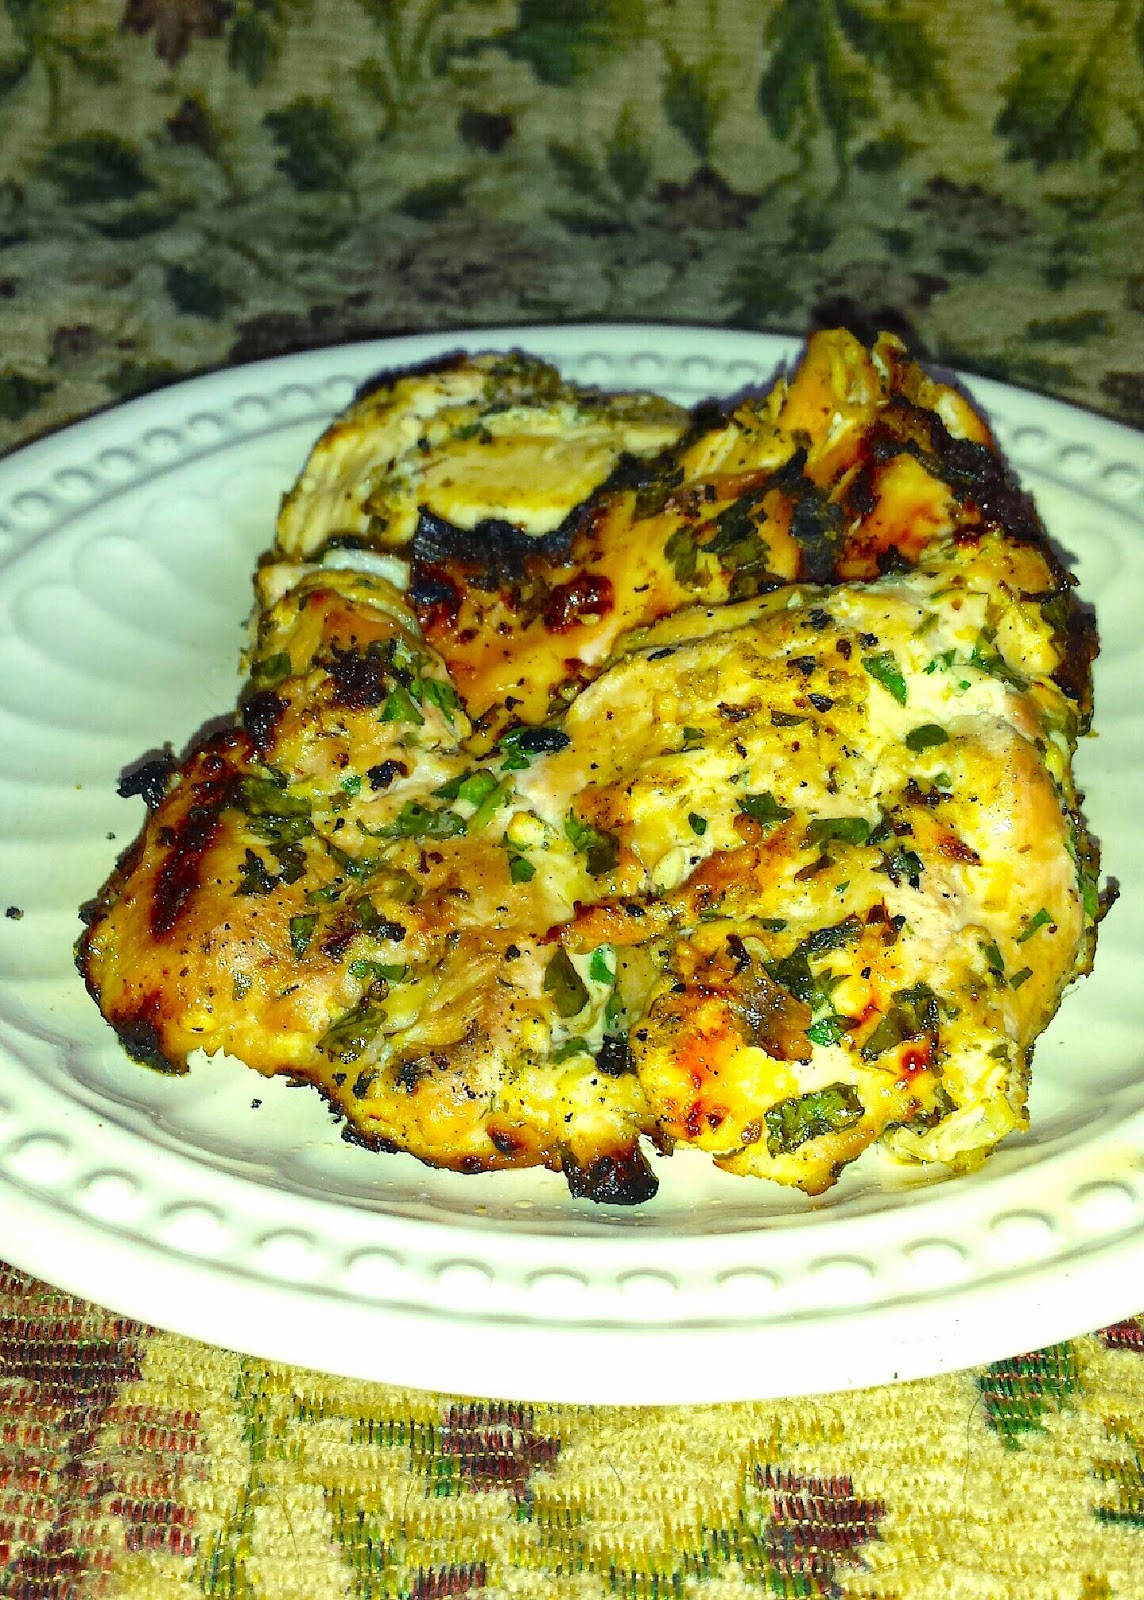
The Husband's Grilled Chicken

Let me brag on my man for a minute. Not only is he an all-around swell guy, he's also a grill master. Armed with his trusty Weber, he can barbecue the best burgers, steaks, and pork chops I've tasted. My current favorite of his culinary masterpieces: Grilled Chicken.

When most people think of grilled chicken, they picture a boneless, skinless chicken breast that is charred beyond recognition. It's dry, bland, and all-around terrible. But the husband has solved the problem of grilled chicken.

He starts with bone-in, skin-on chicken pieces. Using bone-in chicken adds extra flavor. The skin helps protect the chicken, and its rendered fat bastes the chicken as it cooks. Then he adds a flavorful spice rub to give the mild meat extra pizzazz. Seasoning the chicken the night before really allows the flavor to sink in. He grills the meat over high heat to crisp up the skin, then moves it to low heat to finish cooking without drying out.

Put the husband's Grilled Chicken on your menu for this weekend. Let us know how you like it, and post your pics to our Facebook page or share them on Instagram with the hashtag #HDHH. We can't wait to see what you've been up to!

Let's get cooking grilling!
Erin


The Husband's Grilled Chicken

Bone-in, skin-on chicken pieces - We use breasts, legs, and thighs.
BBQ Spice Rub (see recipe below)

Use your fingers to gently lift the skin away from the chicken while still leaving it attached. Generously sprinkle BBQ Spice Rub in the pockets you create under the skin as well as on top of the skin. Cover chicken with plastic wrap and allow it to sit in the fridge overnight if possible. This helps the flavor sink into the meat. (If you forgot to plan ahead, oh well! Just proceed to the grill!)

Pull chicken out of the fridge and allow it to come to room temperature for 30 minutes before grilling.

Meanwhile, preheat charcoal grill to medium hot with a double-banked fire. (That means you make a pile of charcoal on both sides of your grill, but leave the middle empty.)

Place chicken skin side-down over the hot part of the grill. (The sides with the coals.) This crisps up the skin. Cook chicken about 6 minutes, until the skin is browned.

Flip chicken and continue cooking over direct heat to crisp up the other side for 5-6 minutes longer. Then move chicken (still skin-side up) to the middle, cooler section of the grill. (If your grill has a thermometer, make sure the temperature is around 375-400 degrees.) Finish cooking the chicken over indirect heat until the chicken reaches an internal temperature of 165 degrees, about 5-6 minutes longer.

Remove chicken to a plate, tent with foil and allow to rest for 5-10 minutes before serving.

BBQ Spice Rub
1/4 cup chili powder (I use Penzey's Chili 9000.)
2 tablespoons brown sugar
2 tablespoons Kosher salt
1 tablespoon black pepper
3/4 teaspoon chipotle chili powder

Mix all ingredients together in a small bowl. Store covered at room temperature until you're ready to use it. This recipe makes quite a bit of  seasoning, so you might not use it all at once. You can store any extra BBQ Rub in a sealed container at room temperature for a few weeks.

Monday, April 11, 2016

Lamb Burgers with Feta-Tzatziki Goodness

We don't have a traditional Easter dinner Chez George. Every year is different, which itself is a tradition. This past Easter we grilled lamb burgers. The entire family and our dinner guest Christina LOVED them. Lucky for Christina we were headed out of town for Spring Break the next day so she got the benefit of two leftover lamb burgers and leftover couscous.

I chose a lamb burger recipe from Food Network and adapted it slightly -- namely increasing the amout of meat by a half pound and adding a little of the Moroccan spice mix ras el hanout, which tastes yummy in lamb dishes. The Food Network knew what it was doing in adding feta to the traditional cucumber and yogurt tzatziki. But it had the name all wrong; it's not just feta-tzatziki spread -- it's Feta-Tzatziki Goodness. It's zat good. (I can feel you rolling your eyes. Don't care. I'm punny.)

When you're tired of regular old burgers this summer, give these lamb burgers a try.

XOXO,
Amy


Lamb Burgers with Feta-Tzatziki Goodness
Based on this Food Network recipe

Ingredients for the Lamb Burgers:
1 tablespoon olive oil
2 red onions, 1 cut into 1/4 inch dice, 1 sliced for garnish (if desired; nobody in my family likes raw red onion)
1 teaspoon kosher salt
Pinch of crushed red pepper
2 cloves garlic, minced
2 pounds ground lamb
2 sprigs of fresh oregano, finely chopped
1/2 bunch fresh dill finely chopped (I tried two stores and both were out of fresh dill. I improvised with 1 tablespoon stir-in dill paste and 1 teaspoon dried dill.)
1/2 bunch fresh mint, finely chopped
Zest of 1/2 lemon
4 whole wheat pitas, sliced in half
Fresh Tzatziki-Feta Goodness (recipe follows)
1-2 beefsteak tomatoes, sliced, for garnish
2 cups baby spinach, for garnish

Ingredients for the Tzatziki-Feta Goodness:
2 cups plain Greek yogurt
1/2 cup crumbled feta
1 tablespoon white wine vinegar
2 cloves garlic, minced
2 sprigs fresh mint, finely chopped
1 small bunch of fresh dill or 1 1/2 teaspoons dried dill
1/2 English cucumber, coarsely grated
Kosher salt

Directions for the Tzatziki-Feta Goodness:

Note the chill time and so make this before you start the burgers. Combine yogurt, feta, vinegar,  garlic, mint, dill  and cucumber. Season with salt. Let sit for at least 1 hour at room temperature before serving.

Directions for the Burgers:
Add olive oil, onions, salt and red pepper to large saute pan. Bring pan to medium-high heat and cook for 3 to 4 minutes. Add the garlic and cook for 2 to 4 more minutes. Turn off the heat and let onions cool.

In a large bowl, combine the lamb, cooled onion mixture, oregano, dill, mint, lemon zest and 1/2 to 3/4 cup water.

Lamb is softer than beef and harder to form into patties. Put lamb mixture in fridge for 15 minutes or more until it hardens up a bit.

Preheat grill.

Form the lamb mixture into 6-8 equal patties. Sprinkle with salt if  desired. Grill burgers to your desired doneness -- about 4 to 5 minutes per side for medium rare. Remove the burgers from the grill and let rest for 3 to 4 minutes.

Schmear the top (and bottom, if you like!) of your burger with the Feta-Tzatziki Goodness. Top burger with tomatoes, sliced onions and spinach. Slide into the pita. Note: It might be easier to either cut all sides of the pita so you are not stuffing the burger inside, or cut your burger in half as you would slice a bagel in half.


Wednesday, September 23, 2015

Grilled Cabbage with Thai Dressing

If you need a speedy way to spice up your menu, this grilled cabbage will do the trick.

I don't usually cook cabbage, but my husband and oldest son love it. When I get in a rut, they remind me that I haven't made cabbage in awhile.

In fact, I had not whipped up this side dish in more than a year. Thank goodness for those Facebook flashbacks to remind us of what we were doing so many months ago. This little gem popped up on my feed. Thank goodness. 

Everyone in our house gobbled this up, and my boys even had seconds —which hardly ever happens with a vegetable. We enjoyed the cabbage with a roasted chicken. It makes the perfect lunch all by itself the next day.

The folks over at The Kitchn get all the credit here, and their notes about grilling the cabbage ahead of time are perfect. These cabbage steaks hold up beautifully in the fridge. Just warm them up in the microwave and you are good to go.

I recommend doubling the dressing, because it tastes so good you'll want some leftover for the next time you have salad. 

Mangia! Mangia!
Andrea


Grilled Cabbage with Thai Dressing
Inspired by this recipe from The Kitchn.

For the dressing:
1/4 cup fresh lime juice (bottled is OK, too)
1/4 cup extra virgin olive oil
1 teaspoon fish sauce
1 to 2 teaspoons minced garlic
1/3 cup fresh cilantro (Leaves and thin stems. Remove thicker, tougher stems)
1/2 teaspoon salt
1/2 teaspoon black pepper
1/2 teaspoon sugar

Place all ingredients in a blender and mix until smooth. Give it a taste. You might want add a bit more lime juice or fish sauce, depending on your taste. The dressing will have an orangey-green hue.

For the cabbage:
1 head green cabbage
Vegetable oil

Preheat your gas grill to medium-high. If you are using a charcoal grill, you'll want low flames. You can also use a grill pan and cook up the cabbage on the stovetop.

Slice cabbage into wedges that are about 1 inch thick. You should get at least eight and you might end up with more, depending on how large the cabbage is. Brush both sides of each cabbage slice with oil.

Grill cabbage for about 6 minutes or until the edges are charred. Flip over and cook for another 5 to 6 minutes, again grilling until the outer leaves acquire some black char. 

Remove from grill, top with dressing, garnish with slices of lime and serve warm.

To warm up leftover cabbage (or if you did your grilling in advance,) place cabbage slices on a microwave safe plate, cover with plastic wrap or wax paper and heat for about 45 seconds a slice.


Wednesday, August 12, 2015

Grilled Scallops with Blistered Green Beans

I'm having a love affair with scallops this summer — ever since I realized how well they hold up on the grill.

This main dish is easy to prep and super simple to cook.

The husband and I really enjoy these scallops, and so does my youngest, Sam. Add a beer for the grown ups and it's the perfect summer meal.

Mangia! Mangia!
Andrea


Grilled Scallops

2 pounds large (sea) scallops, fresh or frozen
2 tablespoons olive or vegetable oil
2 to 3 tablespoons lemon juice, lime juice or some of both
Fresh ground black pepper to taste
Salt to taste
1 to 2 tablespoons chopped fresh cilantro or Italian (flat leaf) parsley

Thaw scallops if frozen. Pat dry and place in medium bowl.

Mix together oil, lemon and/or lime juice, salt and pepper and cilantro or parsley. Pour over scallops and gently stir to coat all of the scallops. Let sit in refrigerator for 15 to 30 minutes.

Meanwhile, heat your grill to medium high heat. Spray a grill grate with cooking spray.


Place scallops on grill and cook for about 4 minutes or until lightly browned. Turn scallops and cook for another 4 to 5 minutes.

Remove from grill and plate these babies up with some green beans.

Blistered Green Beans

1 pound or 1 1/2 pounds green beans, trimmed
2 tablespoons olive oil
2 teaspoons fresh ground black pepper
1 teaspoon coarse salt
1 to 2 tablespoons lemon juice (optional)

Toss green beans with oil, lemon juice and salt and pepper in a 9 x 13 metal or foil pan. (I use an old jelly roll pan.)

Cook on grill for 4 to 5 minutes, stirring once or twice. Continue cooking until green beans are lightly browned and blistered on at least one side. Drain off oil before serving.


Wednesday, July 22, 2015

Grilled Nectarines

The fruits of summer are great to cook with. When we get overloaded with nectarines, I like to use my grill to add a touch of caramelized flavor. And as our own Erin points out, "This is the perfect way to use nectarines when you don't think they are juicy enough yet."

These gently cooked fruits make a luscious side to pork chops or a sweet dessert topping.

Grilling stone fruits couldn't be easier. All you need to add is a little oil to prevent the skins from sticking to the grill grates.

Be sure to use semi-firm nectarines. Very ripe fruit will fall apart on the grill.

I recommend trying this with peaches and plums, too.

Mangia! Mangia!
Andrea


Grilled Nectarines

6 to 8 semi-firm, yellow flesh nectarines
1 to 2 tablespoons vegetable or olive oil
Vanilla ice cream or pound cake (or any other dessert that needs a topping)

Heat your gas grill to medium. Prepare charcoal grill as you normally would.

Wash and dry nectarines. Cut each fruit in half and remove the pits. Place nectarine halves in bowl and toss with oil to coat fruit.

Put nectarines skin-side down on heated grill and cook for 5 to 6 minutes. Flip fruit and cook for another 5 minutes, or until fruit is soft.


Remove nectarines from grill and let cool in a bowl or on a deep plate to catch any juices. As the fruit cools, the juices will form a sweet, syrupy sauce.

Slide skins off nectarines and slice or dice fruit. Combine cut fruit with any juice from bowl and use as a dessert topping. Refrigerate any leftovers to use tomorrow!


Friday, July 17, 2015

Mediterranean Lamb Chops

Well hello from the west coast! As I mentioned, my boys and I packed up our junk and moved across the country to Seattle. We've been here about two weeks, and things are starting to feel like home. I mean, we still have box tunnels set up for Danny in the living room and all, but my kitchen is ready for action.


Recently we were sick of unpacking, so we decided to invite the husband's cousin and his wife over for dinner. (They promised they didn't mind climbing over the box tunnel.) When we were discussing the menu, we wanted something easy and delicious. Mediterranean Lamb Chops were just the ticket.

Mouth-watering, tender lamb loin chops are marinated with Middle Eastern-inspired flavors and charred on a hot grill. The marinade includes za'atar, a spice my mother-in-law introduced me to. It's a blend of oregano, thyme, basil, sesame seeds, sumac, and other spices. We are big fans. If you don't find it at your local supermarket, you can order za'atar from Amazon or through Penzey's Spices. It has a unique flavor, and it's worth seeking out.

Next time you fire up the grill, change it up from your usual steak and give these Mediterranean Lamb Chops a try.

Let's get cooking!
Erin


Mediterranean Lamb Chops
Serves: 4

1/4 cup olive oil
1/4 cup lemon juice
2 tablespoons za'atar
1 teaspoon salt
1/2 teaspoon pepper
2 pounds lamb loin chops (about 8 bone-in chops)
Chopped parsley for garnish (optional)

In a small bowl, whisk together olive oil, lemon juice, za'atar, salt, and pepper. Place lamb chops in a baking dish or a gallon-sized ziploc baggie and pour marinade over the top, turning to coat. Marinate lamb at least 2 hours or up to overnight.

When you're ready to cook, allow lamb chops to come to room temperature for 30 minutes. Meanwhile, preheat your grill to medium high and oil the grates. (If you have a charcoal grill, build a fire that's hot on one side and cooler on the other.)

Grill the lamb chops for about 4 minutes on each side, until they're nicely charred. Then turn the heat down to low (or move the chops to the cooler side of your charcoal grill), and continue grilling for an additional 5 minutes or until lamb reaches desired doneness in the center. Remove the lamb chops to a plate and cover with foil. Allow them to rest for 5-10 minutes so the juices can redistribute. Garnish with chopped parsley and serve.

Wednesday, July 15, 2015

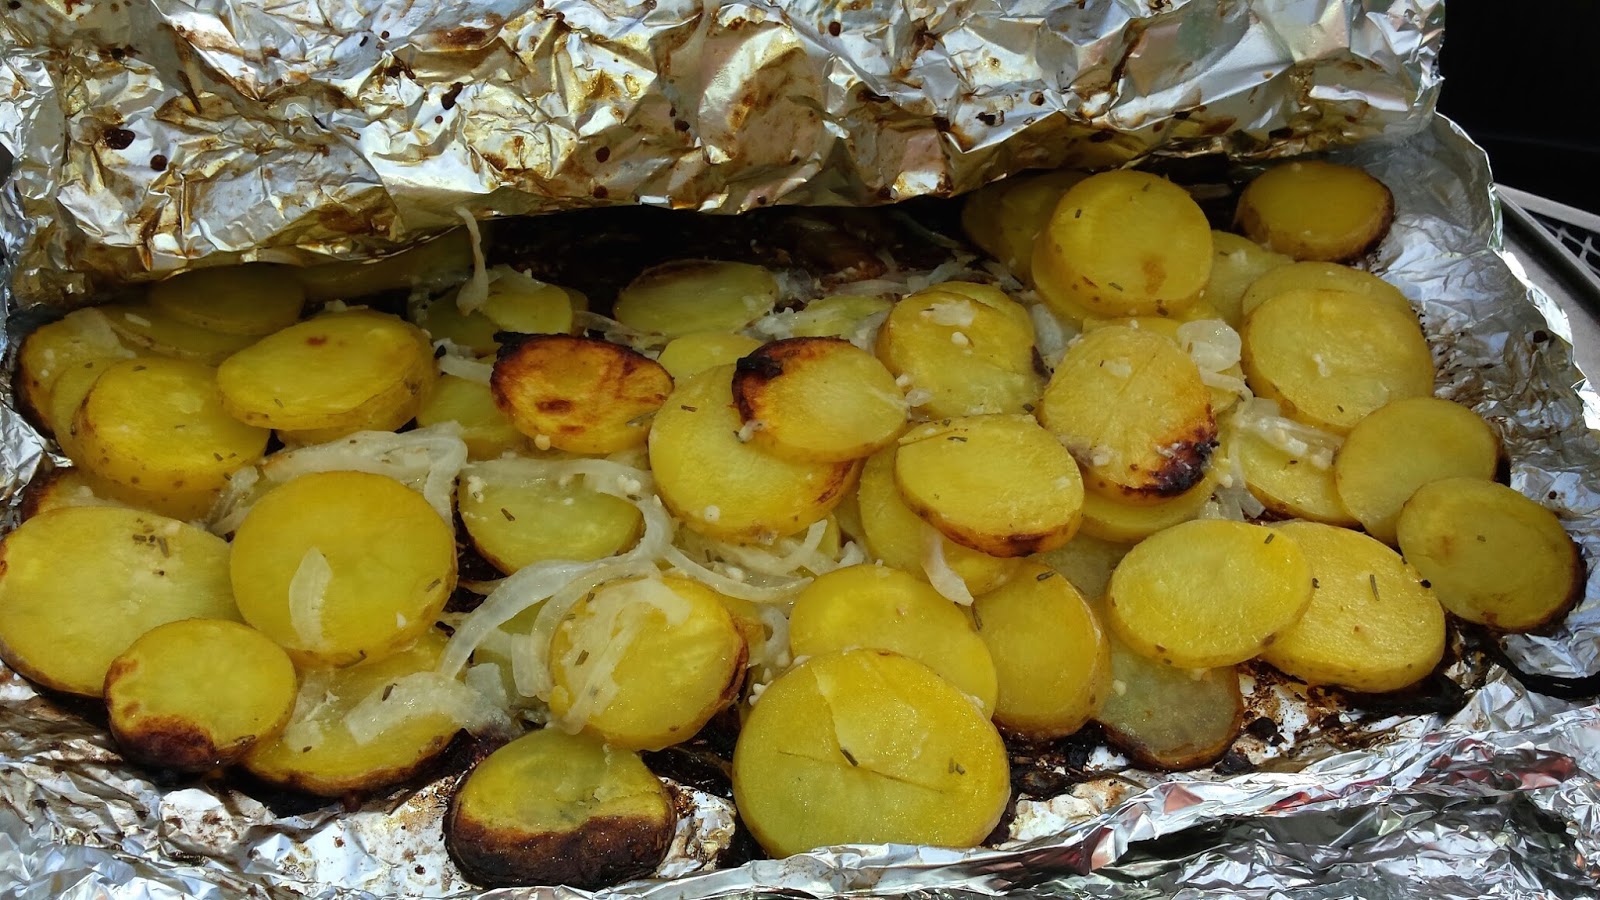
Packet Potatoes

It's finally starting to feel like summer here in Illinois: hot and humid. That means the last thing I want to do for dinner is turn on the oven. Thank goodness for my grill.

These potatoes come out tender and mellow with just a little bit of crispness around the edges. The combination of garlic and rosemary is a savory favorite of mine and milk adds sweetness that tastes so good with the onions.

This is an ideal side for a main dish like grilled chicken or London broil. The leftovers hold up well and can be turned into breakfast after a quick toss in a skillet with some chopped red or green bell peppers to freshen them up. Serve alongside some fried or scrambled eggs.

Mangia! Mangia!
Andrea


Packet Potatoes
Inspired by Guy Fieri

3 pounds potatoes (Yukon or Russet or Idaho), thinly sliced into rounds
1 small to medium yellow onion, thinly sliced
3/4 cup milk (2% or whole)
1 tablespoon minced garlic
3 tablespoons unsalted butter, diced
3 tablespoons grated Parmesan cheese
1 teaspoon dried or fresh rosemary leaves, crushed or chopped

Heat grill to medium.

Mix all ingredients in large bowl.

Take a 20-inch sheet of aluminum foil and fold it in half. Place half of the potato mixture on foil and fold up edges about a 1/2 inch. Repeat for the remaining potatoes.


Top with another piece of foil and crimp around all edges, wrapping bottom foil up.

Place foil packets on heated grill and cook for 15 to 20 minutes.


Wearing oven mitts, use a large flat spatula to remove foil packets from grill and place on a cookie sheet. Let sit for 5 minutes.

Remove top piece of foil and serve — straight from the packet or after you transfer potatoes to a serving dish for a nicer presentation.


Wednesday, July 1, 2015

Turkey Feta Spinach Burgers with Pepperoncini Sauce

These are my all-time favorite burgers because of the way the briny feta cheese, earthy spinach and mellow onions combine with the zing from the sauce. It's a pleasure party for the palate.

If you're looking for a different take on July 4 fare, give these a try.

Mixing the feta and spinach with the turkey keeps the burgers super moist and flavorful. The creamy and spicy pepperoncini sauce delivers a refreshingly cool topper for this casual dinner.

I used to only cook these on the stovetop with my grill pan, but I've been toying with variations to keep the burgers from falling apart on my outdoor grill. Thanks to some collaboration with my nutritionist sister-in-law Karen S., this recipe ensures success with either cooking method!

Mangia! Mangia!
Andrea


Turkey Feta Spinach Burgers with Pepperoncini Sauce
Inspired by chef Sara Moulton

For the burgers
2 tablespoons olive oil, divided
1/2 cup chopped white or yellow onion
5 oz baby spinach
Salt and pepper to taste
3 ounces feta cheese
2 tablespoons chopped fresh oregano
1 pound lean ground turkey
1 egg
1/4 cup or more of old fashioned oats, optional

For the sauce:
1/4 cup nonfat plain Greek yogurt
1/4 cup low fat mayo
2 tablespoons seeded and chopped pepperoncini peppers (from a jar)
1 tablespoon pepperoncini liquid from the jar
1 or 2 teaspoons lemon juice
1 teaspoon minced garlic
Salt and pepper to taste

Heat oil in a large skillet over medium-high heat. Add onion and cook until it begins to brown, about 5 or 6 minutes.  Add spinach and stir until wilted. Season with salt and pepper. Transfer to a colander and let spinach and onion drain off excess liquid.

As spinach cools, you can mix up the creamy pepperoncini burger topper. In a small bowl, combine all ingredients for the sauce. Stir well and set aside.

Now you are ready to form your burgers. Mix together ground turkey, egg, spinach and onion, feta cheese, oregano, salt and pepper. If mixture seems too moist and loose, add oats to help add form. Shape into patties. You'll get four large or six to eight slider-sized burgers. Use whatever size makes sense for your family.

Spray burgers with cooking spray and grill over medium heat for about six minutes on each side.

If using buns, spread some pepperoncini sauce on the bottom buns and add the burgers. Spoon more  sauce over the burgers and top with bun. Or go bun-less and just use the sauce.


Wednesday, June 17, 2015

Grilled Eggplant Salad

Recipe inspiration is all around us — even at the local pharmacy.

The idea for this side dish originates from one of those free diabetes magazines. I was flipping through it while waiting for a script to be filled, way back in 2011. I love eggplant and usually grill it basted in balsamic vinegar and olive oil. Mixing it up with mint and lemon juice?? Just the ticket for a summer dinner.

When grilled, the eggplant takes on a creamy texture and the red onions mellow. Together with the mint and lemon juice, those tastes are super refreshing.

My husband and I devour this dish, which I usually serve with grilled steak or pork chops. It's growing on my boys, and I think I've served it to most of my relatives. I've grilled the vegetables on my outdoor grill and on the stovetop using my grill pan. Sometimes I forget the parsley. It doesn't matter – it always tastes so good.

I use a large eggplant and a large or jumbo red onion because I usually burn some pieces in the grilling process and have to toss them out. If you are an expert griller, tell me your secrets!

If there are any leftovers, I like to use them tossed with salad greens and crumbled feta cheese.

Mangia! Mangia!
Andrea


Grilled Eggplant Salad

1 large eggplant, sliced into 1/4 inches rounds
1 large red onion, sliced into 1/4 inch rounds
Vegetable or olive oil cooking spray or enough oil to coat eggplant and onion rounds
Juice of 1 lemon (2 to 3 tablespoons)
1/3 cup chopped flat leaf parsley
2 to 3 tablespoons chopped fresh mint
1 tablespoon olive oil
Freshly ground black pepper
Pinch of cayenne pepper
Optional: 1 to 2 teaspoons lemon zest

Preheat grill to medium. Spray or brush both sides of eggplant and onion slices with oil.

Grill eggplant and onion slices on medium for 2 to 3 minutes each side. Remove from grill and let cool on cutting board or in a bowl.


While vegetables cool, combine lemon juice, parsley, mint, olive oil, black pepper and cayenne pepper in medium bowl.

Chop eggplant and onion and add to bowl. Stir to combine. Serve immediately or chill to serve later.

Wednesday, June 10, 2015

Greek Grilled Chicken

Now that warm weather has arrived, I am devoted to my grill. I love the flavor that cooking over the coals adds to meat and veggies. Plus, I get to spend a few minutes on our back patio sipping a cold drink while I cook dinner.

This marinated chicken is easy to prep and combines the tangy zip of yogurt with the bright freshness of lemon. You can use any cut of chicken, with the skin on or off. I like it best with skinless and boneless thighs. The slightly higher fat content of the dark meat means it stays moist.

Serve with your favorite house salad and a side of minty sugar snap peas. This also tastes great the next day, alone or on top of a salad.

Mangia! Mangia!
Andrea


Greek Grilled Chicken

1 cup plain greek yogurt
2 tablespoons olive oil
Zest of one lemon
Juice of one lemon
2 to 4 teaspoons minced garlic
1/2 tablespoon dried oregano
1/2 teaspoon salt
1/2 teaspoon black pepper
1 cup chopped flat leaf parsley
3 to 4 pounds of chicken pieces, such as thighs, breasts, legs

In a medium-sized bowl, mix together all ingredients except the chicken. Pour into large ziplock bag. Add chicken and seal bag. Massage chicken and marinade to coat all chicken pieces. Then place in refrigerator for 30 minutes to an hour.

Heat outdoor grill or a stovetop grill pan to medium. Remove chicken from marinade, and discard the marinade left in the bag.

Grill chicken, about 5 minutes or so on each side. Serve warm or cold.

Friday, July 19, 2013

Asian Chicken Salad

Today we're making Asian Chicken Salad. Not in the mood for salad? Don't be deterred! This star of this recipe is the grilled chicken. A fast, Asian-inspired marinade adds tons of flavor to boring old chicken breasts. You can just make the chicken and serve it with rice and Sesame Green Beans if that suits your fancy.

But the salad is really great! So refreshing and crunchy and summery. Don't let the ringing endorsement of the chicken in the previous paragraph keep you from making the salad.

And now I'm blabbering. Good gosh. Just make some dinner. Cheers to salad. Or not salad.  


Asian Chicken Salad
Serves: 4
Adapted from Menu Musings

1/4 cup soy sauce
3 tablespoons fresh ginger, minced
1/4 cup vegetable oil
2 tablespoons hoisin sauce
1 teaspoon salt
1/8 teaspoon (or more to taste) red pepper flakes
2 chicken breasts, pounded to even thickness
1/4 cup red wine vinegar
1 large head Napa cabbage, cored and thinly sliced
3 large carrots, shredded
2/3 cup chopped fresh cilantro
1/2 cup sunflower seeds*

In a jar or small bowl, mix together soy sauce, ginger, oil, hoisin sauce, salt, and red pepper flakes. Place chicken in a baking dish or a Ziploc bag and pour 4 tablespoons of the marinade over the chicken. Turn to coat the chicken and allow it to marinate for about 30 minutes.

Add vinegar to the remaining marinade and set aside. This will be the dressing.

Preheat grill or grill pan to medium-high. Grill chicken for 4-5 minutes on each side, until it reaches an internal temperature of 165 degrees. Once chicken is fully cooked, allow it to rest for about 10 minutes so the juices redistribute. Cut chicken into bite-sized pieces.

In a large bowl mix cabbage, carrots, cilantro, sunflower seeds, and chicken. Drizzle with dressing to taste and toss to coat.

*Don't have sunflower seeds sitting in your pantry? Feel free to substituted toasted slivered or sliced almonds.

Monday, June 24, 2013

Fish Tacos with Chipotle Coleslaw

Steamy summer weather begs for a light dinner. Preferably one you can make on the grill. These fish tacos are perfect after a day spent lounging by the pool, sipping pina coladas at the beach, or traversing the town on your bicycle.

But they're also perfect after a day crunching numbers at your desk, when your ledger was illuminated by the ghastly glow of fluorescent tube lights. Where your office dress code dictated that closed-toed pumps and (gasp!) pantyhose hid your pedicure.

So roll your windows down on your commute home tonight. Crank up the summer jams and wear your shades.

Fish tacos will remind you that summer is really here.


Fish Tacos with Chipotle Coleslaw
Serves: 4
Coleslaw adapted from Centsational Girl

8 corn tortillas
1/4 cup low fat mayonnaise
1/4 cup low fat sour cream
2 limes, divided (You need the juice from the first lime and slice the second lime into wedges for serving.)
1/2 teaspoon adobo sauce (from a can of chipotle chiles in adobo)*
2 tablespoons chopped fresh cilantro, plus extra cilantro for serving
1 teaspoon agave (or substitute honey)
Salt
14 ounces coleslaw mix (The bag of shredded cabbage, carrots, etc. Feel free to shred your own if you're so inclined.)
1 1/2 pounds tilapia fillets
Chili powder
Olive oil
Guacamole, for serving

Preheat the oven to 350 degrees. Wrap tortillas in foil and pop them in the oven for about 10 minutes, until tortillas are soft and pliable. (You can also heat the tortillas in the microwave or on the grill if you prefer.)

In a medium bowl, whisk together mayonnaise, sour cream, the juice from 1 lime, adobo sauce, chopped cilantro, agave, and salt to taste. Stir in the coleslaw mix. Refrigerate until you're ready to serve.

Heat your grill (or a grill pan if your gas grill is out of gas...sigh) to medium high. Meanwhile shake a bit of salt and chili powder on both sides of the tilapia. No need to measure. Just sprinkle the seasoning on until it looks good to you. Drizzle the tilapia with olive oil so it doesn't stick and then grill for about 3 minutes on each side, until the fish flakes easily with a fork. Flake the fish into big chunks and set onto a platter for serving.

Let everyone build their own tacos. I like to load my tortilla with fish, coleslaw, a generous squeeze of lime, and a few leaves of cilantro.

*If you like things spicy, feel free to chop up a bit of the actual chipotle chile and stir it into the coleslaw. I'm a bit of a spice wimp, so I skipped it.

Friday, May 17, 2013

Grilled Wedge Salad with Low-Fat Blue Cheese Dressing

Last month my sister, Kate, shared with us about her fave local haunt, Flour + Wine. One of their specialties is a Grilled Wedge Salad. Well, I had to make one for myself.

Crunchy Romaine lettuce with a smokey char from the grill. Juicy slices of tomato. Bites of salty bacon. Rich and creamy (yet low fat!!) blue cheese dressing. Come on, now. How can you not make this tonight?

Let's grill some lettuce.
--Erin


Grilled Wedge Salad with Low-Fat Blue Cheese Dressing
Dressing from America's Test Kitchen
Serves: 4

For the dressing:
1/4 cup crumbled blue cheese
1/4 cup buttermilk
1/4 cup light mayonnaise
1/4 cup lowfat sour cream
2 tablespoons water
2 teaspoons white wine vinegar
1/4 teaspoon garlic powder
Salt and pepper

Smoosh the crumbled blue cheese and buttermilk together in a bowl. Whisk in the remaining ingredients until well combined, seasoning to taste with salt and pepper. (You'll probably have extra dressing leftover.)

For the salad:
2 heads Romaine lettuce
1 tablespoon olive oil
1 very large tomato, sliced in wedges
6 slices bacon, cooked and crumbled
1/4 cup crumbled blue cheese
Pepper

Preheat your grill (or grill pan if you're cooking indoors) to medium-high. Cut each head of Romaine in half lengthwise, leaving the stems intact to hold the leaves together. Brush the cut sides of Romaine with oil. Grill the Romaine, cut side down, for about 2 minutes, just until grill marks appear.

Place the grilled Romaine on a serving platter. Top with tomato slices, bacon, and blue cheese crumbles. Drizzle with low-fat blue cheese dressing and sprinkle with pepper.

Monday, July 30, 2012

Grilled Green Beans

I had no plans for Saturday morning...no plans except to sleep in as late as I wanted, that is.

When I opened my eyes that lovely morn, birds were chirping. The cheery sun was streaming into my bedroom. (Well, streaming is a bit of an overstatement. It was filtering in through the blinds and the curtains I had drawn to keep it out.) It must be, what, 10:00? 11:00 a.m.? I smiled at my impressive sleep skills and rolled over to check my clock.

6:50. 6:50 a.m. And I was rarin' to go. So much for being well-rested.

Since I was awake, I decided to hit up the Wauwatosa Farmers Market. When I arrived (after getting ready at a leisurely pace), the farmers were still putting the finishing touches on their wares. They hadn't even officially opened yet, for crying out lout. When you're ready to go before the farmers, you know you're out of your league in terms of waking up early.

I swung by my favorite bakery stand (Yes, I go to the farmers market for pastries. Don't judge.), and the owner greeted me with a smile. "Would you like to be our first customer?" I realized I had first pick of all the muffins, all the croissants, all the cookies that I could want.

And that, my friends, is a darn good reason to wake up at the crack of dawn.

Now for something healthy to make up for the gigantic triple berry muffin I ate...

Grilled Green Beans
Serves: 4
Technique discovered on food.com

1 pound green beans, washed and stem ends trimmed
Salt and pepper
1-2 tablespoons water
Butter for serving, if desired

Preheat grill to medium-high. Meanwhile place two big sheets of aluminum foil on top of each other. Pile green beans in the middle of aluminum foil. Sprinkle with salt and pepper to taste. Carefully pour 1-2 tablespoons of water on top of green beans. 


Gather up the sides of the aluminum foil and crimp them together to make a packet. Place foil packet on the preheated grill. 


Close the lid and cook for 6-9 minutes, until green beans are crisp-tender. Serve with a pat of butter, if desired. 

Monday, June 25, 2012

Barbecued Beer Bratwurst

I do most of the cooking around here, but there are a few things that fall squarely in the husband's territory. During the summer months, I thank my lucky stars that I'm married to a grill master. Not to brag, but let me brag for just a second. The man I'm married to can grill a perfectly medium-rare steak, a juicy chicken breast, and never loses kabob cubes between the grates. And since we moved to Milwaukee, he picked up on a local specialty and learned to make Barbecued Beer Bratwurst (a.k.a. "Brats.")

Usually he makes traditional pork bratwurst, but sometimes it's nice to lighten things up a bit. When the good folks at Gold'n Plump asked if we wanted to try out their chicken bratwurst, I almost jumped out of my skin with excitement. I absolutely wanted to try them! So, in today's post the husband's grilling Gold'n Plump Parmesan Italian Chicken Sausages. They are absolutely delicious.*

Whether you're making chicken sausages or traditional bratwurst, you can use the same technique described below. Just make sure you're starting with raw meat. I imagine things would get pretty overdone if you used pre-cooked sausages. And no one wants that.

Now, go forth and get grillin'!

Barbecued Beer Bratwurst

2-3 bottles of beer (Whatever's languishing in the back of the fridge.)
2 tablespoons butter
Half an onion, sliced
Raw chicken sausages or bratwurst (We used five here, but the husband has used the same technique to make dozens of bratwurst at once. Just use more beer and a big enough pot to cook them all in.)
Buns (We like to use "brat buns." They might call them sausage buns in your neck of the woods.)
Toppings (grainy mustard, barbecue sauce, ketchup, etc.)

Pour the beer into a large saucepan or pot. Add butter, onion, and sausages. Bring to a boil, reduce heat to medium-low and simmer for 20 minutes. (The sausages will not be fully cooked at this point, so don't eat them yet!)

Meanwhile, preheat your grill to medium. Grill par-boiled sausages for about 10 minutes, turning once or twice, until they are cooked through and charred to your liking. Serve sausages on buns with your favorite toppings, including the onions from the cooking liquid if you're so inclined.

*While Gold'n Plump was kind enough to let us try their chicken sausages on the house, these opinions are all mine. And the husband's. And Kelly and Cristoph's, for that matter. We all agreed that these suckers are mighty tasty.

Also...if you're looking for more chicken sausage recipe, my pal, Stef, over at Haute Apple Pie made some fine lookin' Southwestern Chicken Brats a few weeks ago. Check them out here.