Friday, May 29, 2015

Fettuccine with Prosciutto and Peas

Sometimes you need to stuff your face with something delicious and creamy and carby and salty and perfect that you can have on the table in 15 minutes.

This is just the ticket.

It is a simple meal. But so, so good.

Let's get cooking!
Erin


Fettuccine with Prosciutto and Peas
Adapted from Everyday Food
Serves: 3-4

8 ounces fettuccine
1/4 cup half & half
2 cups frozen peas, thawed
8 slices (about 4 ounces) thinly sliced prosciutto, cut into thin strips
Pinch nutmeg
3/4 cup grated Parmesan cheese, plus more for serving
Salt and pepper

Cook fettuccine in salted boiling water until al dente according to package instructions. Reserve a cup of pasta cooking water then drain the pasta. Set aside.

Meanwhile, heat half & half, peas, prosciutto, and nutmeg in a large skillet over medium heat until warmed through, about 3 minutes. Stir in cooked fettuccine and 3/4 cup Parmesan cheese. Add a little bit of reserved pasta cooking water to thin the sauce and help the cheese coat the pasta. (You probably won't need the entire amount; I used about 1/4 cup.) Season to taste with salt and pepper. Serve topped with extra Parmesan cheese.

Wednesday, May 27, 2015

Almond Granola Bars

These granola bars are a spin-off of a recipe that's been circulating among the moms in my Peoria neighborhood for years.  I was recently gifted the ingredient list — and of course started making my own variations.

We're lucky to have lots of kids in our 'hood, and one mom and I often trade baked goods (and favorite cook books) when our kindergarten boys get together. Julie B. introduced me to these light and crisp bars.

By way of pure coincidence, these granola snacks originated with Charity J., a mom in an adjacent subdivision — who was my neighbor when we first moved to town.

In my never-ending quest to provide filling nibbles to my boys, I decided to try making these snacks with almond flour. As I'm learning, almond flour is a gluten-free alternative with more flavor, protein and healthy fats compared to regular flour. I even used it to make triple almond chocolate pudding.

With Max and Sam in the house, a tray of these sweet and chewy morsels disappears pretty fast.

Mangia! Mangia!
Andrea


Almond Granola Bars
Inspired by the moms of Hawley Hills

2 eggs
4 tablespoons vegetable oil (coconut oil would be delicious)
2/3 cups honey
1/2 cup brown sugar
2 teaspoons baking powder
1 cup almond flour
4 cups rice krispie cereal
4 cups old fashioned oats
3/4 cups mini chocolate chips
1/2 cup dried cherries, chopped

Preheat oven to 375 degrees.

In a large bowl, whisk together eggs, oil and honey. Add brown sugar and mix until smooth. Add baking powder, almond flour, rice cereal and oats. Stir until everything is coated in the honey mixture.

Mix in chocolate chips and cherries.

Line a 13 x 9 inch pan with enough parchment paper so that some hangs over the edges. Pour mixture into pan. Using a spatula, firmly press granola into pan. Don't be gentle. You want to really press hard.

Bake for 15 to 25 minutes, depending on how hot your oven is. (Mine runs a little on the cool side, so these took almost 25 minutes.) When the top is golden brown, remove pan from oven.

Let cool completely. Holding the ends of the parchment paper, lift granola from pan and set on cutting board. Slice into bars. Good luck trying to eat just one!

Monday, May 25, 2015

Amy's Guacamole

When Andrea wrote of her family's love for tacos and her DIY Taco Seasoning, I got a craving for my guacamole. I make this guacamole a lot, especially in the summer. It is one thing that everyone in my family loves. I'd make it more, but none of us has any self control. We all basically stuff our faces. You have been warned.

XOXO,
Amy

PS: The garlic is what makes my guac different from others. Feel free to make this your own. Maybe add cilantro or raw onions. Maybe use homemade salsa if that's in your wheelhouse and you have the time.


Amy's Guacamole

Avocados
Garlic
Salsa (your favorite jarred variety)
Kosher salt
Lime (Lemon will do if you are out of limes)

NOTE: All quantities are approximate. How much you use of anything depends on your own taste and how many you are feeding.

Peel 3-4 avocados and place in bowl. Add 1-2 cloves of minced garlic. Add kosher salt and salsa to our liking. Add juice of one half or whole lime. Mash and  combine using a potato masher. Taste and adjust the seasonings -- namely salt and lime juice -- as needed.

When I made this guac last week, my older daughter Lucy was my helper. She insisted on taking what she called the "transition pictures," which show the various steps in the prep. Here they are.


Friday, May 22, 2015

London Broil

When the weather starts getting nice, I typically send the husband out to the grill when I want beef for dinner. (Thanks for being the grill master, honey!) But some days it's rainy. Or neither of us is in the mood to grill. Or I'm just looking for a change of pace.

And that's when I turn to the broiler.

A quick hit of high heat from the broiler caramelizes the exterior of your London broil while leaving the interior rosy pink. And doesn't it seem appropriate to cook London BROIL in the BROIL-er? Yeah, I thought so, too.

One last tip. London broil can be a tougher cut of beef. Cooking the meat to medium-rare or medium, letting it rest for 10 minutes before serving, and slicing it thinly across the grain helps to make sure each serving is perfectly tender.

Let's get cooking!
Erin


London Broil
Serves: 3-4

1/3 cup olive oil
2 tablespoons balsamic vinegar
2 tablespoons lemon juice
1 tablespoon soy sauce
1 tablespoon Worcestershire
1/4 teaspoon garlic powder
1/4 teaspoon onion powder
Pepper to taste
1 pound London broil*

Whisk together oil, vinegar, lemon juice, soy sauce, Worcestershire sauce, garlic powder, onion powder, and pepper. Set aside.

Use a sharp knife to score both sides of the London broil in a diamond pattern. (Scoring just means making shallow cuts in the meat. I think this helps the marinade absorb better. But mostly I just do it because that's what my mom did. Seems a good enough reason to me.) Place meat in a shallow baking dish or a Ziploc baggie. Pour the marinade over the meat and turn to coat. Cover the dish or seal the baggie and place in the refrigerator for a couple hours or up to overnight. Remove from the fridge about 30 minutes before you're ready to cook so it comes to room temperature.

Adjust an oven rack so it's about 4" from the broiler element. Heat the broiler to high. Place the meat on a broiler-safe baking sheet (not glass!) and place under the broiler for 5-6 minutes per side, until the meat reaches an internal temperature of 120 degrees for medium rare. Tent with foil and allow to rest for 10 minutes. (This will allow the juices to redistribute and the meat to come up to temperature another 5-10 degrees.) Thinly slice the London broil against the grain and serve.

*They sell a cut of beef called "London broil" at my grocery store. If you don't see it at the butcher counter, try using flank steak instead.

Wednesday, May 20, 2015

Triple Almond Chocolate Banana Pudding

As you all know, I'm on the hunt for healthy snacks to feed my boys. We need tidbits packed with protein, energy that lasts — and just enough sweetness to make them appealing.

After I shared my popcorn marshmallow bars, the fine folks at Nuts.com invited me to try using almond flour. I love an excuse to get to work in the kitchen and boy, was I pleasantly surprised. I'm a newbie at using gluten-free flours. Almond flour works just like all-purpose white and whole wheat flours and is high in protein and vitamin E.

I'm trying to clean up our diets in general, so I'm thrilled that my kids liked this no-sugar chocolate dessert.  The sweetness comes from extremely ripe bananas. For even more fun, you can make the consistency closer to ice cream by using frozen bananas.

And I definitely suggest eating this power pudding for breakfast! Such a nutty way to start the day. (Sorry, I couldn't resist!)

Mangia! Mangia!
Andrea


Triple Almond Chocolate Banana Pudding
Inspired by Williams Sonoma and The Sprouted Kitchen

2 overripe bananas (fresh or frozen or some of each)
1/4 cup unsweetened cocoa powder
1/3 cups almond butter
1/2 teaspoon cinnamon
Pinch of sea salt
1/3 cup almond milk, divided
1/4 cup almond flour
Optional: for extra sweetness, add 1 or 2 tablespoons of maple syrup or honey

Place bananas, cocoa powder, almond butter, cinnamon and salt in a blender or food processor. Add about 1/8 cup almond milk. Blend until everything is mixed together but not yet smooth. Use a rubber spatula to scrap down the sides of blender or food processor.

Add almond flour and another 1/8 cup almond milk. Blend until smooth, adding more splashes of almond milk as needed to smooth out texture. (Adding the almond flour at the end prevents clumping in the bottom of the blender.)

Transfer to four small bowls. Enjoy immediately, especially if you used frozen bananas.

If you used fresh bananas, this pudding tastes great chilled. Cover bowls with plastic wrap and pop in the fridge for an hour or more. You can make this pudding ahead. It holds up well in the refrigerator for about three days.

Sprinkle with banana slices and nuts, like sliced toasted almonds or chopped pecans. My Sam says it's even better with whipped cream on top.


Monday, May 18, 2015

Easy Yellow Curry Shrimp Pasta

Busy moms need secret sauces. Plain and simple. And I am here to share one of mine with you. Trader Joe's Thai Yellow Curry Sauce. I always have a bottle or two of that -- and Trader Joe's Thai Red Curry Sauce, for that matter -- in my pantry. I also always have a bag of frozen shrimp on hand, too. I snatch up a bag or two whenever they go on special at the grocery.

One day when short on time and without a fully stocked fridge and pantry, I made up this easy, yummy dish. Easy Yellow Curry Shrimp Pasta yields a ton of leftovers, which is also nice. It's now a regular go-to and a hit with my family (excluding one of the daughters, because there's always one) and my neighbors, the beneficiaries of leftovers.

XOXO,
Amy


Easy Yellow Curry Shrimp Pasta

1 medium to large onion, chopped
2 yellow squashes, diced
Olive oil
1 to 2 pounds shrimp, peeled and deveined
Red pepper flakes
16 ounce box of angel hair pasta
1 bottle of Trader Joe's Thai Yellow Curry Sauce


Heat a splash or two of olive oil over medium to medium high heat and add in the onions and yellow squash. Meanwhile, start a pot of water to boil for the pasta.

Saute veggies for two to three minutes. Add in the shrimp and a pinch or two of the red pepper flakes. Cook until shrimp is pink and opaque. This will take just three to four minutes.

Cook entire box of angel hair pasta according to package directions. Drain pasta and in a large bowl or pot combine pasta with shrimp, veggies and curry sauce.

Eat. Enjoy. And don't forget to share with your neighbors.

Friday, May 15, 2015

Coconut Carrot Muffins

Everyone's talking about coconut oil these days. It's the new thing. (Actually, I'm pretty sure it's been a thing for a while now, and I'm just behind the times.) I've heard the virtues of using coconut oil for cooking, cleaning, baking, moisturizing...pretty much everything under the sun. It was high time I gave this newfangled oil a whirl, and Coconut Carrot Muffins seemed like the perfect opportunity.

These healthy muffins are vibrant with carrots and pineapple, studded with sweet raisins, and rich with coconut flakes and coconut oil. And with a pinch of orange zest stirred in, each bite is fragrant with citrus. Geez, are these babies good.

Let's get cooking!
Erin


Carrot Coconut Muffins
Makes 36 mini muffins
Adapted from these Morning Glory Muffins

1 3/4 cups all-purpose flour
1/2 cup whole wheat pastry flour*
2 tablespoons oat bran
1 teaspoon salt
2 teaspoons baking powder
1/2 teaspoon baking soda
2 teaspoons cinnamon
2 whole eggs
2 egg whites
3/4 cup brown sugar
1/2 cup unsweetened applesauce
1/2 cup coconut oil, melted and cooled
8 ounces crushed pineapple
2 teaspoons vanilla
1 teaspoon orange zest (optional)
1 1/2 cups grated carrots
1/2 cup raisins
1/2 cup sweetened flaked coconut

Preheat oven to 350 degrees. Grease a muffin tin or line with paper liners and set aside.

In a large bowl, whisk together all-purpose flour, whole wheat pastry flour, oat bran, salt, baking powder, baking soda, and cinnamon. In a separate bowl, stir together whole eggs, egg whites, brown sugar, applesauce, coconut oil, pineapple, vanilla, and orange zest. Stir the wet ingredients into the dry ingredients. Stir in carrots, raisins, pineapple, and coconut.

Fill prepared muffin tins with batter. I filled my mini muffin cups to the top and ended up with 36 muffins. Bake at 350 for about 15 minutes, until muffins spring back when you touch them and a toothpick inserted into the center of a muffin comes out clean. Allow to cool in the muffin tins for 5 minutes, then remove the muffins to a wire rack to finish cooling.

I made mini muffins, but you could certainly make regular-sized muffins. I would guess they'd need about 25 minutes to bake. If you try it, let me know!


*I happened to have 1/2 cup of whole wheat pastry flour that I was looking to use up. If you don't have whole wheat pastry flour, feel free to use entirely all-purpose flour or substitute whole wheat flour. Also, if you have more whole wheat flour on hand than I did, by all means use more!

Wednesday, May 13, 2015

Family Lasagna

If you've made our Sunday gravy and traditional Italian meatballs, then roll up your sleeves, because you are ready to tackle old-fashioned, Old World lasagna.

Fear not — if you mastered the tomato sauce and meatballs, you're practically Italian already!

I call this "family lasagna" for two reasons: It's more than enough to feed a crowd of relatives (or friends) and you can put everyone to work helping you make it. The process might seem a bit much, but I remember having lots of fun as a kid, sitting around the kitchen table with my parents, my siblings and sometimes my grandparents, chopping meatballs and sausage and mixing up the ricotta cheese filling before building the lasagna.

Yes, there are many short cuts, like using no-boil lasagna noodles or cooking ground beef with some Italian seasonings instead of making meatballs. But trust me. I've made lasagna the quick way numerous times. The final result just can't compare to the real thing.

Mangia! Mangia!
Andrea


Family Meat Lasagna

20 wavy lasagna noodles (usually 1 and 1/2 boxes)
1 tablespoon olive oil
2 (15 ounce) containers of ricotta cheese
5 cups shredded mozzarella cheese, divided
1 1/2 cups shredded parmesan cheese, divided
2 eggs
1 teaspoon salt
1 teaspoon pepper
6 cups or more of homemade tomato sauce
1 1/2 cups cooked meatballs, chopped
1 1/2 cups cooked Italian sausage links, chopped (mild, sweet or hot)

Preheat over to 375 degrees. Cook lasagna noodles according to package directions, adding 1 tablespoon olive oil to water to prevent sticking. After draining noodles, place them on parchment paper.

While lasagna noodles are cooking, mix together ricotta, parmesan cheese, eggs, salt and pepper.

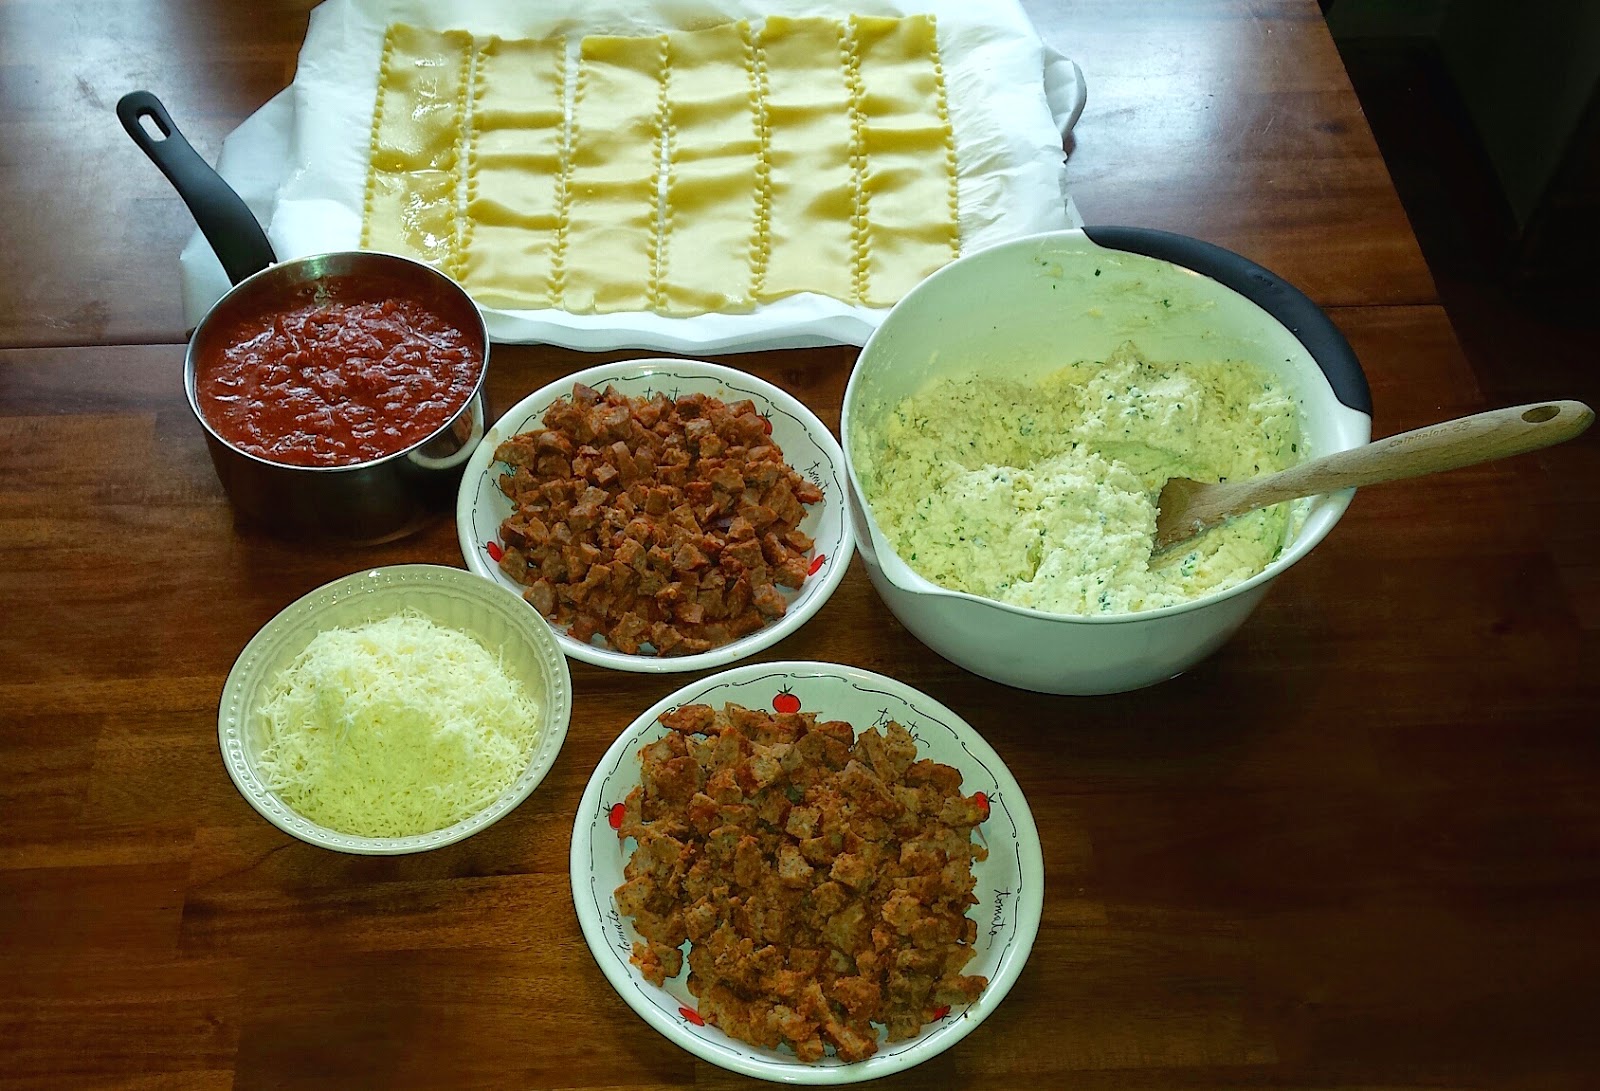
Set up a lasagna prep station, with all ingredients in easy reach.


Cover bottom of a deep 13 x 9 inch casserole dish with 1 cup tomato sauce. Layer 5 lasagna noodles on top, slightly overlapping them.


Top noodles with 1 cup ricotta mixture, 1/2 cup chopped meatballs and 1/2 cup chopped sausage. Top with 1 cup shredded mozzarella and 1 scant cup tomato sauce.


Layer another 5 noodles on top of first meat and cheese layer. Repeat the cheese, meat, mozzarella and tomato sauce layering two more times. Top final noodle layer with tomato sauce, ensuring that corners are covered with sauce. Sprinkle remaining 1 cup of mozzarella cheese and 1/2 cup of parmesan cheese on top.

Cover lasagna with foil lightly sprayed with cooking spray. Bake in 375 degree oven for 45 minutes. Remove foil and cook for 15 minutes more. Lasagna is done when it is bubbly.

Depending on your oven, it can take as long as 90 minutes to cook. You can also bump up the temperature to 400 degrees — just check the lasagna more frequently.

Remove from oven and let lasagna sit for about 15 minutes. Then slice and serve.

**Note on make-ahead preparation: You can prepare the lasagna the night before. Just refrigerate and bake within 24 hours.

**Note on freezing lasagna: If you plan to freeze an entire lasagna, it's best to freeze before cooking. Thaw, then cook as directed above.


Monday, May 11, 2015

Pressure Cooker Chicken Noodle Soup

Lately, I've been loving making chicken noodle soup. And it is super easy now that I also am in love with my pressure cooker. Here's what I do: make my roasted chicken and then throw all the little leftover pieces of meat into the pressure cooker. In a matter of minutes, I have the next day's lunch or dinner in hand.

XOXO,
Amy

PS: Sometimes when I am feeling extra thrifty, I make this soup with homemade broth.


Pressure Cooker Chicken Noodle Soup

Cut up cooked chicken, about 1-2 cups

3 large carrots, peeled and diced ½” inch thick
3 celery stalks, chopped
1 medium onion, chopped
1 cup uncooked noodles
32 oz. chicken broth
1 teaspoon thyme
Salt and pepper to taste

Add the cooked chicken, veggies, thyme, noodles and broth to the pressure cooker. Cover and cook on high pressure for six minutes.

Note about the chicken: Again, you can use all white or all dark meat or any combo. You can usually find enough meat from the “scraps” of a homemade roasted chicken or a store-bought rotisserie bird.

When time is up on the pressure cooker, do a quick release and remove the lid when it is safe to do so. Add salt and pepper to taste. Serve and enjoy!

Friday, May 8, 2015

Sauteed Green Beans with Lemon

Spring is here, and the weather in Charlotte has been gorgeous. With the temperature rising, I haven't been in the mood to roast my vegetables. This may come as a shock to those of you who've been reading this blog for a long time and know how much I adore roasted veggies. From asparagus to radicchio, I have roasted it.

But now my taste buds are craving something lighter and fresher. So I set out to find a way to cook green beans that was as simple and delicious as roasting.

Well, you guys, I think I found my new warm weather go-to: Sauteed Green Beans with Lemon.

Let's get cooking!
Erin


Sauteed Green Beans with Lemon
Serves: 4

1 tablespoon butter
1 pound green beans, stem ends trimmed
1/4 cup water
1 teaspoon lemon juice
1/4 teaspoon lemon pepper
Salt

Melt butter in a large skillet over medium high heat. Add green beans and cook until they get brown spots, about 5 minutes, stirring occasionally. Add water and cover skillet. Allow beans to cook until they're bright green and beginning to soften, about 2 minutes. Uncover skillet and continue to cook until beans are crisp-tender and liquid has evaporated, another minute or two. Turn off the heat and stir in lemon juice, lemon pepper, and salt to taste.

Wednesday, May 6, 2015

Popcorn Marshmallow Bars

Lately it seems my boys never stop eating.

They are hungriest right after school. I've been struggling to find semi-healthy snacks they want to eat — that also make them feel full.

They love rice krispie treats these days, so I started thinking about ways to bulk up the current snack du jour. If you can mix cereal with melted marshmallows, why not popcorn?

The salty-sweet results are pretty delicious. Drizzle a little chocolate on top and the kids will think it's extra-special. In fact, my 9-year-old asked for some in his lunch box and told me, "Mom, if you make these every week, you'll never have to buy snacks again!"

Score one for Mom.

Mangia! Mangia!
Andrea


Popcorn Marshmallow Bars

20 ounces mini marshmallows
2 tablespoons unsalted butter
1/4 teaspoon kosher salt
20 cups air-popped popcorn 
1/4 to 1/2 cup chocolate chips 

**A note on the popcorn. If you don't want to pop your own corn, grab a bag of air popped popcorn at the grocery store. If it's lightly salted, omit the kosher salt.

Line a 9 x 13 inch baking pan with enough parchment paper so that paper hangs over edges of pan. Lightly coat parchment with cooking spray.

In a large Dutch oven or pot, combine marshmallows, butter and salt. Melt over medium heat, stirring constantly until smooth.

Remove from heat. Stir in popcorn and combine until all of the popcorn is coated in marshmallow mixture. (Depending on the size of your pot, it may be easier to mix popcorn and melted marshmallow in a giant bowl.)

Transfer popcorn mixture to pan. Press down using spatula or parchment paper coated in cooking spray.

Microwave chocolate chips for 30 seconds. Stir. Microwave for another 30 seconds and stir. Repeat as needed until chocolate is completely melted and smooth. Drizzle over popcorn in pan. Refrigerate until chocolate hardens, between 10 and 20 minutes.

Remove pan from refrigerator. Holding edges of parchment paper, lift popcorn mixture from pan and place on cutting board. Cut into bars. 


Tuesday, May 5, 2015

DIY Taco Seasoning

There's no better day for a taco than Cinco de Mayo!

At my house, we need no excuses to eat tacos for dinner. My DIY taco seasoning is quick to prepare and my kids have fun experimenting with all kinds of ways to top the meat in their taco shells.

One day, after promising tacos for dinner, I went to pull the fixings from the taco shelf in my pantry (yes, I do devote an entire shelf to this cuisine) and found no seasoning packets. So I went looking for fixes in the spice cabinet. After lots of experimenting, I've settled on this make-your-own concoction.

We think it tastes way better than the pre-mixed envelopes of spices. Bonus: No additives.

Of course I've used this seasoning on ground beef, turkey and chicken and diced leftover roasted chicken and turkey. Works every time!

Ole!
Andrea


DIY Taco Seasoning

2 tablespoons chili powder
1 tablespoon ground cumin
2 teaspoons cornstarch (optional)
2 teaspoons kosher salt
1 1/2 teaspoons smoked paprika
1 teaspoon coriander
1/2 teaspoon ground cayenne (red) pepper
1/2 teaspoon garlic powder
1/2 teaspoon onion powder
1/2 teaspoon oregano
1 teaspoon black pepper
1/4 teaspoon red pepper flakes

Stir together all ingredients in a bowl. This recipe makes enough for a few taco dinners, so store what you don't use in an airtight container.


Stir 2 tablespoons of DIY taco seasoning into 1 pound of cooked and drained meat, along with 1/4 cup to 1/2 cup of water. (Note: If you want to avoid the cornstarch, just leave it out and reduce the water.)

Heat through over medium heat.

Now you're ready to dish up some tasty soft or hard tacos along with your favorite toppings. Enjoy your fiesta!


Monday, May 4, 2015

Tomato-Avocado Quinoa Salad

When Erin introduced Andrea and me as the new "bringers of hot dinner," she mentioned that I like to experiment with vegan cuisine. True. One of my favorite new cookbooks is Angela Liddon's The Oh She Glows Cookbook.

But sometimes I don't like how much work goes into cooking vegan. That's why I like this easy, yummy tomato-avocado quinoa salad and why it is a weekly must-make, must-eat Chez George. My husband, younger daughter and I love to have this for lunch or dinner. (Let that sink in. My husband and six year-old eat quinoa!) It's an easy lunch to pack for work. And it's healthy and filling as quinoa is an ancient grain and complete protein. It's also gluten free.

You'll find other quinoa recipes here at Hot Dinner Happy Home. There's Greek Quinoa Salad. There's Warm Quinoa Salad with Spinach and Mushrooms. There's Quinoa with Corn and Black Beans. Check out our vegetarian section for more.

XOXO,
Amy


Tomato-Avocado Quinoa Salad
Quinoa
Cherry tomatoes
Avocado
Cracked pepper
Salt
Olive oil

Cook quinoa according to the package directions. We always cook a full bag at a time, because between Jeff, Penny and I it doesn't take long to eat it up.

Slice cherry tomatoes in half

Cut up avocado.

Depending on how hungry you are, put a cup or two of quinoa into a bowl. The quinoa can be warm, room temp or cold. Jeff prefers it cold. I like it all ways. Top with tomatoes, avocado, cracked pepper, salt and 1 tablespoon olive oil. Eat and feel awesome about the healthy choice you made to fuel your body.

Friday, May 1, 2015

Fan Friday

We love it when you guys make our recipes. And we really love it when you tell us what you think after you've made them!

Today, in honor of you—the fabulous fans of Hot Dinner Happy Home—and your stellar culinary skills. we're sharing pictures and comments from HDHH readers. These are their favorite recipes, but what about you? What's your favorite Hot Dinner recipe? Share your kitchen creations with us, and we might feature them on the next fan Friday! Find us on Facebook, email us at hotdinnerhappyhome@gmail.com, tweet us (Amy, Andrea, Erin), or give us a shout-out on Instagram.

xoxo,
The Ladies

Mo made Shepherd's Pie II.

As you can see in her picture, she whipped up four shepherd's pies at once. Impressive! We asked her about bulk cooking, and here's what she shared, "I made four pies in the picture and froze at least 3. I cover in foil then put in a plastic produce bag with twistie. Then when I want to serve I put in the oven at 400 degrees for about 2 hours, or thaw for most of the day and then put in the oven til hot and bubbly. Still delicious! I can't get enough of it!" (Mo, we're impressed by your planning ahead. And by your recycling of plastic produce bags! Great idea.)


Dave made Turkey, Black Bean and Sweet Potato Chili.

Here's what he had to say, "This was a really, really good chili recipe and I have made dozens of versions before. When I posted this on Facebook, one of my friends, who lives in Oregon, dissed it as impossible to be chili because it has sweet potatoes and other non-traditional ingredients. But I totally disagree, a really interesting recipe. Of course, I messed with it since I used both black beans and kidney beans, and doubled up on the tomatoes and some of the spices." (Dave, we're glad you made this dish your own. And thanks for defending this non-traditional chili!)

Cindy made Carmelitas.

She also baked Brown Sugar Oatmeal Coffee Cake.

She says, "The carmelitas turned out perfect. One of the best recipes I've found for these addicting bars. The oatmeal coffee cake was a big hit with my family and friends. The oatmeal, brown sugar and not too sweet outcome made it delightful. This blog and variety of recipes is fantastic. The blog is so pleasing to the eye and stomach and the recipes I've tried make my family smile." (Thanks, Cindy! You're making us blush.)