Showing posts with label grilled. Show all posts

Wednesday, September 23, 2015

Grilled Cabbage with Thai Dressing

If you need a speedy way to spice up your menu, this grilled cabbage will do the trick.

I don't usually cook cabbage, but my husband and oldest son love it. When I get in a rut, they remind me that I haven't made cabbage in awhile.

In fact, I had not whipped up this side dish in more than a year. Thank goodness for those Facebook flashbacks to remind us of what we were doing so many months ago. This little gem popped up on my feed. Thank goodness. 

Everyone in our house gobbled this up, and my boys even had seconds —which hardly ever happens with a vegetable. We enjoyed the cabbage with a roasted chicken. It makes the perfect lunch all by itself the next day.

The folks over at The Kitchn get all the credit here, and their notes about grilling the cabbage ahead of time are perfect. These cabbage steaks hold up beautifully in the fridge. Just warm them up in the microwave and you are good to go.

I recommend doubling the dressing, because it tastes so good you'll want some leftover for the next time you have salad. 

Mangia! Mangia!
Andrea


Grilled Cabbage with Thai Dressing
Inspired by this recipe from The Kitchn.

For the dressing:
1/4 cup fresh lime juice (bottled is OK, too)
1/4 cup extra virgin olive oil
1 teaspoon fish sauce
1 to 2 teaspoons minced garlic
1/3 cup fresh cilantro (Leaves and thin stems. Remove thicker, tougher stems)
1/2 teaspoon salt
1/2 teaspoon black pepper
1/2 teaspoon sugar

Place all ingredients in a blender and mix until smooth. Give it a taste. You might want add a bit more lime juice or fish sauce, depending on your taste. The dressing will have an orangey-green hue.

For the cabbage:
1 head green cabbage
Vegetable oil

Preheat your gas grill to medium-high. If you are using a charcoal grill, you'll want low flames. You can also use a grill pan and cook up the cabbage on the stovetop.

Slice cabbage into wedges that are about 1 inch thick. You should get at least eight and you might end up with more, depending on how large the cabbage is. Brush both sides of each cabbage slice with oil.

Grill cabbage for about 6 minutes or until the edges are charred. Flip over and cook for another 5 to 6 minutes, again grilling until the outer leaves acquire some black char. 

Remove from grill, top with dressing, garnish with slices of lime and serve warm.

To warm up leftover cabbage (or if you did your grilling in advance,) place cabbage slices on a microwave safe plate, cover with plastic wrap or wax paper and heat for about 45 seconds a slice.


Wednesday, July 22, 2015

Grilled Nectarines

The fruits of summer are great to cook with. When we get overloaded with nectarines, I like to use my grill to add a touch of caramelized flavor. And as our own Erin points out, "This is the perfect way to use nectarines when you don't think they are juicy enough yet."

These gently cooked fruits make a luscious side to pork chops or a sweet dessert topping.

Grilling stone fruits couldn't be easier. All you need to add is a little oil to prevent the skins from sticking to the grill grates.

Be sure to use semi-firm nectarines. Very ripe fruit will fall apart on the grill.

I recommend trying this with peaches and plums, too.

Mangia! Mangia!
Andrea


Grilled Nectarines

6 to 8 semi-firm, yellow flesh nectarines
1 to 2 tablespoons vegetable or olive oil
Vanilla ice cream or pound cake (or any other dessert that needs a topping)

Heat your gas grill to medium. Prepare charcoal grill as you normally would.

Wash and dry nectarines. Cut each fruit in half and remove the pits. Place nectarine halves in bowl and toss with oil to coat fruit.

Put nectarines skin-side down on heated grill and cook for 5 to 6 minutes. Flip fruit and cook for another 5 minutes, or until fruit is soft.


Remove nectarines from grill and let cool in a bowl or on a deep plate to catch any juices. As the fruit cools, the juices will form a sweet, syrupy sauce.

Slide skins off nectarines and slice or dice fruit. Combine cut fruit with any juice from bowl and use as a dessert topping. Refrigerate any leftovers to use tomorrow!


Monday, June 15, 2015

Grilled ABC (Avocado Bacon Cheese) Sandwich

My husband and I do our best to instill important values in our children.

There's the Golden Rule: "Treat others as you would like to be treated."

And then there's Lucy's and Penny's Golden Rule: "Bacon makes everything better."

The grilled avocado bacon cheese sandwich is not an every day sandwich; it's a special treat, for sure. I make it whenever we have the good fortune of having ripe avocados and a little bit of bacon that needs to be used up.

XOXO,
Amy


Grilled Avocado Bacon Cheese Sandwich

Bacon
Butter spread or softened butter
Sliced bread
Avocado, sliced
Cheese slices

Cook bacon on a cookie sheet in the oven at 400 degrees. It will take about 15 minutes. No need to flip the bacon halfway. You will know when the bacon is done when it is sizzling all over. (BTW, I recently learned there is no other way to cook bacon. The mess is contained and the bacon stays flat versus curling up like it does in a frying pan.)

While bacon is in the oven, butter the outside of your slices of bread. Place buttered side down in a skilled sprayed with Pam. Turn heat under the skillet to medium to medium high. Place a piece of cheese on top of the bread and then layer with avocado. Next, layer with the cooked bacon, which you blotted with paper towels after removing from the oven. Layer another piece of cheese on top of the bacon. Add the top piece of bread. Cook as you would a grilled cheese. Be carefully flipping the sandwich so the insides don't spill out all over.

Eat up and enjoy just like this little girl!


Here's Penny giving thumbs up to her first grilled avocado bacon cheese sandwich. It was February 2, 2014, a date that called for a fun, festive, yummy dinner to honor Penny's fifth birthday and Super Bowl Sunday. The only thing that would have made the occasion better would have been if Penny's beloved Carolina Panthers had been playing in the big game.


Wednesday, June 10, 2015

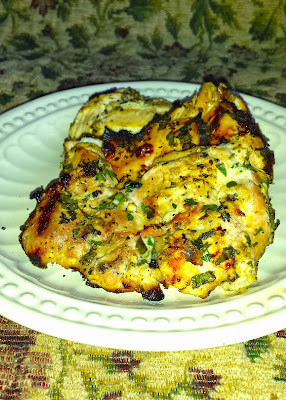
Greek Grilled Chicken

Now that warm weather has arrived, I am devoted to my grill. I love the flavor that cooking over the coals adds to meat and veggies. Plus, I get to spend a few minutes on our back patio sipping a cold drink while I cook dinner.

This marinated chicken is easy to prep and combines the tangy zip of yogurt with the bright freshness of lemon. You can use any cut of chicken, with the skin on or off. I like it best with skinless and boneless thighs. The slightly higher fat content of the dark meat means it stays moist.

Serve with your favorite house salad and a side of minty sugar snap peas. This also tastes great the next day, alone or on top of a salad.

Mangia! Mangia!
Andrea


Greek Grilled Chicken

1 cup plain greek yogurt
2 tablespoons olive oil
Zest of one lemon
Juice of one lemon
2 to 4 teaspoons minced garlic
1/2 tablespoon dried oregano
1/2 teaspoon salt
1/2 teaspoon black pepper
1 cup chopped flat leaf parsley
3 to 4 pounds of chicken pieces, such as thighs, breasts, legs

In a medium-sized bowl, mix together all ingredients except the chicken. Pour into large ziplock bag. Add chicken and seal bag. Massage chicken and marinade to coat all chicken pieces. Then place in refrigerator for 30 minutes to an hour.

Heat outdoor grill or a stovetop grill pan to medium. Remove chicken from marinade, and discard the marinade left in the bag.

Grill chicken, about 5 minutes or so on each side. Serve warm or cold.