Friday, October 30, 2015

Peanut Butter Energy Bites

I'm pretty sure my son is the pickiest eater in the history of picky eaters. Here are the things he will eat:
  • Creamy Peanut Butter (Only eaten if he can lick it off a honey wheat pretzel. Please note: he doesn't eat the pretzel itself; it's merely a vehicle.)
  • Saltines (Don't even try to give the kid Ritz. He eats only square-shaped crackers.)
  • Annie's White Cheddar Bunnies (Not the orange ones. This I learned after purchasing a lifetime supply of the orange ones at Costco.)
  • Macaroni and Cheese (Must be from a box.)
  • Mashed Potatoes (Must be instant. Seriously.)
  • Apples, Bananas, Melon, Grapes (Preferably purple.)
  • Anything in a squeezie pouch. (As an experiment I once served him squash and a squash squeezie pouch in the same meal. He ate the pouch and refused to touch the stuff on his plate. Try explaining the irony to a three-year-old.)
  • Noodles (Served plain. Don't consider adding sauce.)
  • Oatmeal (He would eat oatmeal for breakfast, lunch, and dinner if I let him.)
  • SWEETS (Cupcakes! Ice cream! Cake! Cookies! Chocolate! The boy knows the good stuff.)
On a whim I decided to enlist his help in whipping up these Peanut Butter Energy Bites. They contained three of his food groups, so I thought there was a chance he'd try them. And, glory be, he did. And...he liked them! 

Guess what we're having for lunch every day now. 

Let's get cooking!
Erin


Peanut Butter Energy Bites
Adapted from Get Creative Juices
About 24 bites

1 cup old-fashioned oats
1/2 cup peanut butter
1/2 cup semi-sweet chocolate chips
1/3 cup finely chopped toasted pecans
1/3 cup sweetened shredded coconut
1/4 cup honey
2 tablespoons chia seeds
1 teaspoon vanilla

Place all ingredients in a large bowl and stir together until everything is evenly combined. Roll into 1" balls and place on a parchment- or waxed paper-lined baking sheet. Refrigerate until set, about 1-2 hours. Store in the refrigerator.

P.S. If at all possible, enlist the help of your adorable kid in making Peanut Butter Energy Bites. Here's mine, making his "CHEESE!" face. (Also pictured, my very messy house. Real life here, people.)


Wednesday, October 28, 2015

Apple Crisp

A trip to the apple orchard here in Central Illinois is one of my family's fall traditions. It gives us a chance to go out into open country and appreciate nature a little more.

My boys and any friends who come along love running down the rows of apple trees and seeing who can pick the fruit highest up the tree. The kids usually eat their weight in apples before we're done filling up our bags — it's all part of the experience. 

We pick more apples than we need. At home, we make at least one apple pie before we switch over to apple crisp.

This year, Jonathan and Golden Delicious apples were ready when we went picking. I've never used either in baking and am surprised at how well these apples melt down while keeping some firmness.

When it comes to making the crisp topping, I'm not a purist. With this dessert, I added some shredded coconut and chopped nuts, just because I had a small amount of each taking up space in the pantry. When you're mixing things up with brown sugar, cinnamon and butter, it's bound to taste delicious.

Mangia! Mangia!
Andrea


Apple Crisp

4 cups apples, peeled and sliced (A mixture works best. Add a Granny Smith for tartness.)
3/4 cup packed light brown sugar
3/4 cup old fashioned oats
1/2 cup flour (white or whole wheat)
1/8 cup to 1/4 cup shredded coconut
1/8 cup to 1/4 cup chopped pecans
1 teaspoon cinnamon
3/4 teaspoon nutmeg
1/8 teaspoon ground ginger or ground cloves
1/2 cup butter, softened

Preheat oven to 375 degrees. Grease an 8 x 8 inch baking pan with butter or cooking spray. Place apples in pan to evenly cover the bottom. (If you double the recipe, use a 9 x 13 inch pan.)

In a medium bowl, mix brown sugar, oats, flour, cinnamon, nutmeg and ginger (or cloves.) Place butter in bowl. Using a pastry cutter or two butter knives, blend butter into dry ingredients until crumbs form.

Generously sprinkle crisp topping over apples to cover. (You might have some topping left over. Save it in the fridge or freezer to use on oatmeal.)

Place on the middle rack in your oven and bake for 30 to 40 minutes or until the topping is browned and the apples are bubbly.

Let cool for 5 to 10 minutes. Serve warm with vanilla ice cream.


My boys Max and Sam and their friend John goof around after picking apples.

Monday, October 26, 2015

Slow Cooker Chicken Stock

A friend tried my roasted chicken recipe and afterward she made chicken stock in her slow cooker. She told me that once I tried it I would never make stock on the stove top again.

So, the last time I roasted a chicken, I put the frame in the slow cooker overnight along with all the necessary ingredients and when I got up in the morning...voila chicken stock! My friend was right. I will never again make chicken stock any other way.

So, then, I took that chicken stock -- all eight cups -- and made a double batch of my pressure cooker chicken noodle soup.

The dreaded Fall cold has swept through the George house, so this soup will have us all feeling better in no time -- and there's enough to freeze! BTW, both the soup and the stock by itself freeze nicely.

XOXO,
Amy

PS: No slow cooker? Check out how to make chicken stock the old fashioned way in Andrea's post "Chicken Stock & Chicken Tortellini Soup."


Slow Cooker Chicken Stock

Frame of one roasted chicken
Two carrots, peeled
Two celery stalks
1 medium to large onion, peeled and quartered
1 lemon, sliced in half
2 to 3 garlic cloves, pierced with a knife but left whole
1 bay leaf
Fresh herbs (whatever you have on hand), tied into a bouquet with kitchen twine if you have it

Place all ingredients in slow cooker and fill to top with water. Set to low for eight hours.

Remove chicken frame and all the solid ingredients. Pour stock into containers, using a mesh strainer to catch all the small bits and pieces. Place stock in refrigerator. I recommend not using the stock right away but letting it cool in the fridge so that you can remove the light layer of congealed fat that forms at the top of the broth. After you do that, use the broth in your favorite soup or recipe or freeze for later.


Friday, October 23, 2015

Hands-Off Butternut Squash Soup

I love butternut squash soup, and there's plenty of proof here on Hot Dinner Happy Home. I've made Curried Butternut Squash Soup, Roasted Butternut Squash Soup, and Apple Butternut Squash Soup. One would think I covered this delicious autumn treat in plenty of detail, but no. I need to take it one step further to solve the one issue I have with butternut squash soup: cutting up the squash.

It is a pain in my patootie (yes, I'm the mom of a toddler) to slice butternut squash. First you have to peel the darn thing. Then you have this giant, slippery vegetable, and you're supposed to take a knife to it? Yeah, good luck. It's like chopping down a tree with a butter knife. Typically I buy pre-cut butternut squash to save myself the hassle, but it's more expensive. And I hate to pay extra for something I can technically do myself.

So I set about making butternut squash soup that didn't require any squash chopping. I microwaved the whole squash until it was easy to slice in half. Then I roasted it with carrots, apple, and onion to add some complexity to the soup. It was super simple to scoop the cooked squash out of the shell and puree it with the veggies and some broth. And Hands-Off Butternut Squash Soup was born!

Let's get cooking!
Erin


Hands-Off Butternut Squash Soup

1 large butternut squash
4 carrots, peeled and cut into 1" chunks
1 apple, peeled and cut into 1" chunks
1 onion, peeled and cut into 1" slices
1 tablespoons plus 1 teaspoon olive oil, divided
Salt and pepper
2 - 2 1/2 cups chicken or vegetable broth
Sour cream for serving (optional)

Preheat oven to 450 degrees.

Pierce squash with a fork in several places. Microwave 10 minutes on high, flipping over halfway through. (We want the squash to soften enough so it's nice and easy to slice in half.) Remove squash and allow it to rest until it's cool enough to handle. Slice squash in half lengthwise and scoop out seeds. Drizzle both cut sides of squash with 1 teaspoon olive oil and sprinkle generously with salt and pepper. Place cut-side down on a rimmed baking sheet.

Place carrots, apple, and onion on a second large rimmed baking sheet. Drizzle with remaining 1 tablespoon olive oil and sprinkle generously with salt and pepper. Toss the vegetables so they're evenly coated and spread into a single layer on the baking sheet.

Roast the squash and carrots, apple, and onion for about 30 minutes, stirring the carrots, apple, and onion halfway through, until the vegetables are tender and caramelized.

Set aside squash for a few minutes until it's cool enough to handle. Scoop remaining vegetables into a large pot over medium heat. Pour about 1/4 cup broth into the rimmed baking sheet and scrape the browned bits off the bottom to incorporate the flavors into the broth. Pour broth from the baking sheet into pot with the vegetables. Once the squash has cooled, scoop the flesh into the pot. Pour about 1 3/4 cups broth into the pot. Use an immersion blender to puree the soup to your desired consistency. (If you don't have an immersion blender, blend in batches in a blender.) If the soup is too thick, stir in remaining broth until you're happy with the consistency.

Serve soup with a dollop of sour cream.

Wednesday, October 21, 2015

Hearty Egg Casserole

If you've never tasted a farm fresh egg, you haven't lived.

I didn't know this until my former co-worker Kevin started raising chickens. He often shared extra eggs with those of us on staff who wanted them. The flavor is so good that there is no need to add  anything — the eggs can easily stand on their own.

It's like the difference between a tomato from the garden and one you buy in the grocery store. No comparison. Fresh eggs from chickens that eat a varied diet and roam free pack a richer punch to the palette.

So I didn't think it was possible to get farm-fresh taste from grocery store eggs. Not so! The folks at Blue Sky Family Farms asked us to give their free range, organic, humanely raised eggs a try.

These beauties are the real thing. The shells are harder, the yolks are a deep orange color and the flavor tastes like eggs should.

We tried these brown eggs by themselves in scrambled and fried versions. The eggs are light and fluffy and simply delicious. They'd also be perfect for Soft Boiled Eggs or Spring on Toast.

My brother Greg happened to be visiting when the Blue Sky Family Farms eggs arrived, so we decided to use a dozen in a casserole, We wanted to see how the eggs hold up when baked with cheese, potatoes, sausage and tomatoes. Greg is always experimenting in the kitchen and gets the credit for this recipe. You can serve this egg bake at breakfast, lunch or dinner, with toast, fruit or even a green salad.

Finally, if you're not raising your own chickens or don't have access to farm fresh eggs, you can find Blue Sky Family Farms eggs at many grocery stores in Illinois, Indiana, Wisconsin, Ohio and Kentucky.

Mangia! Mangia!
Andrea


Hearty Egg Casserole

1 15 ounce can sliced white potatoes
1 dozen eggs
2/3 cup half and half
1 teaspoon salt
1 teaspoon pepper
1/2 to 1 cup cooked sausage crumbles
1 brick of Gruyere cheese, sliced (between 1/2 pound and 1 pound)
2 tomatoes, sliced
1/4 cup shredded Parmesan cheese

Preheat oven to 375 degrees. Grease a 9-by-13 inch baking pan with butter or cooking spray.

Place sliced potatoes in a singe layer in bottom of pan. Sprinkle sausage on top of potatoes.

Crack eggs into a medium bowl, add half and half and salt and pepper. Whisk together until yolks are broken and incorporated into mixture. Pour eggs into pan over sausage and potatoes.

Lay slices of Gruyere evenly in pan.


Top with sliced tomatoes. Sprinkle with Parmesan cheese.


Place in oven on middle rack and cook for 45 minutes to 1 hour, or until casserole is puffed and light browned on top.


Let cool for about 10 minutes before slicing and serving.


Blue Sky Family Farms free range eggs are packaged in the pretty carton above.


Monday, October 19, 2015

Soul-Soothing Red Lentil Stew

As the weather recently turned more brisk and some seasonal stress piled on at work, I craved the comfort of a stew. Some people believe chicken noodle soup to be food for the soul and I can appreciate that. (Please see Pressure Cooker Chicken Noodle Soup.) But what soothes my soul lately: a good lentil stew.

XOXO,
Amy

PS: This photo doesn't do my stew justice.


Soul-Soothing Red Lentil Stew
Adapted from America's Test Kitchen Slow Cooker Revolution, Volume 2: The Easy-Prep Edition

2 tablespoons coconut oil
4 cloves minced garlic
1 tablespoon garam masala
2 pinches of red pepper flakes
2 1/2 cups water
4 carrots, peeled and cut into 1/4-inch pieces
1 cup red lentils, rinsed
Salt and pepper
4 tomatoes, cored and cut into 1/2-inch pieces
1 1/2 cups light coconut milk
2/3 cup frozen peas

Spray inside of slow cooker with vegetable oil spray.

Microwave coconut oil, garlic, garam masala, and pepper flakes in bowl, stirring occasionally, until fragrant, about one minute. Transfer to slow cooker. Stir in water, carrots, lentils, 1 teaspoon salt, 1 teaspoon pepper. Cover and cook for 6-8 hours on low.

Stir in tomatoes, coconut milk, and peas. Cover and cook for another 6 hours on low. Yeah, you gotta be patient for this stew, but I think it's worth it.

Hubby and girls ate this stew with crackers. I preferred to top mine with avocado.

Friday, October 16, 2015

Apple Cranberry Stuffed Pork Loin

I don't know about you, but I'm reveling in all things autumn. The crisp air, colorful leaves, piles of pumpkins adorning every porch. But the best part? The food.

Autumn food is cozy food. Every meal feels like a warm hug. And Apple Cranberry Stuffed Pork Loin is no exception. Sweet apples and ruby red cranberries are the perfect complement to roast pork loin.

This would be a fabulous meal for guests. Not only does it look impressive, but you can saute the apples and stuff the pork loin ahead of time and bake it just before dinner. That way you can focus on cocktails with your company instead of slaving over the stove. "Another Spiked Cider? Yes, that sounds lovely, thanks."

Let's get cooking!
Erin


Apple Cranberry Stuffed Pork Loin
Adapted from America's Test Kitchen
Serves: 6-8

1 tablespoon butter
3 apples, peeled and chopped into 1/4" pieces
1 onion, finely diced
2 teaspoons honey
1/2 cup low-sodium chicken broth
1/3 cup dried cranberries
1/4 teaspoon herbes de Provence*
Salt and pepper
2-2.5 pound pork loin, butterflied**

Preheat oven to 375 degrees. Grease a 9" x 13" baking dish and set aside.

Heat butter a large skillet over medium-high. Add apples, onion, and honey, and saute until apples and onion are soft and golden, about 15 minutes. Stir in chicken broth, dried cranberries, and herbes de Provence, scraping the bottom of the pan to incorporate browned bits into the sauce. Cook until most of the liquid has evaporated, about 2-3 minutes. Season to taste with salt and pepper.

Season the inside of the pork loin with salt and pepper. Spread stuffing on top of the pork loin (there will be lots!) and roll to close. (It will look like a savory Ho Ho. And I love Ho Hos.) Use kitchen twine to tie the roast in several places to make sure it stays closed. Season the outside of the pork with salt and pepper and place in prepared baking dish.

Roast pork loin for about 1 hour, until the internal temperature reaches 140-145 degrees. Tent with foil and allow to rest for 15-20 minutes. Remove twine and slice before serving.


*Don't have herbes de Provence? Try substituting thyme.

**Ask your friendly butcher to do this for you. It will make your life—and dinner—much easier.

Wednesday, October 14, 2015

Parmesan Herb Risotto & Leftover Risotto Cakes

If you've never made risotto I am here to tell you how easy it is.

The myth of constant stirring required to obtain the creamy rice texture scared me off for years. But then I took the plunge. I followed the directions on whatever brand of arborio rice I purchased and got to mixing.

Here's why risotto is one of my go-to meals in colder months: it can be fancy enough for company and it's a warm and filling side dish or main meal for everyday, too.

The trick with risotto is to make sure you don't stray too far from the stove. While you do need to stir the rice often, it's OK to take small breaks to chop herbs or rest your arm.

Best thing about risotto? It is so versatile! So many combinations of vegetables, cheese and even shrimp or chicken work well in this saucy rice dish.

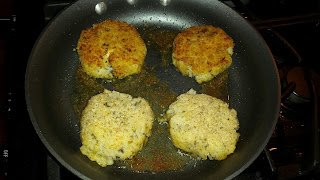
And if you are lucky enough to have leftovers, you can let the kids make risotto cakes the next day.

Mangia! Mangia!
Andrea


Parmesan Herb Risotto

1/2 cup chopped white or yellow onion
2 tablespoons olive oil
4 tablespoons butter, divided
1 cup arborio rice
2 cups chicken broth, divided
1 cup white wine (Use your favorite. Chardonnay or Savignon Blanc work well in this recipe.)
1/2 cup Parmesan cheese
1/3 cup chopped fresh herbs (this time I used oregano and parsley)

Note: If you plan to double this recipe use a 4 1/2 quart or a 5 quart pot.

In a 2 quart or 3 quart pot, heat oil and butter until butter is melted. Add onion and saute for about 3 minutes. Add raw rice and stir for another 2 minutes, or until lightly browned.

Add one cup of chicken broth. Continue cooking and stirring until liquid is absorbed. Add second cup of chicken broth and keep stirring until broth is absorbed. Add 1 cup wine and stir until no liquid remains.

Remove from heat and stir in remaining butter, parmesan cheese and herbs. Mix until butter and cheese is melted. Eat while still warm.


Leftover Risotto Cakes

Leftover risotto
1 or 3 Mozzarella cheese sticks
Plain or Italian seasoned bread crumbs or panko (1/2 cup is plenty for 4 risotto cakes)
1 to 2 tablespoons olive oil

Warm risotto in microwave for a minute or two so it is easier to handle. Scoop up a heaping tablespoon of leftover  risotto and form a large ball. Repeat until all of your risotto is used.

Unwrap a mozzarella cheese stick and cut it into pieces about a 1/2 inch long. One cheese stick will fill 4 risotto cakes. Poke a hole in each risotto ball. Insert one piece of cheese into ball and reshape so that the hole is covered and closed.


Pour breadcrumbs into a shallow bowl. Gently roll risotto balls one at a time in bread crumbs to coat.


Heat oil in a skillet. Place risotto balls in skillet and slowly flatten with a spatula. Cook for about 3 to 4 minutes and then turn risotto cakes over. Cook for another 3 or 4 minutes, or until a nice crispy brown crust forms.


Remove from skillet and place on a plate lined with paper towels. Serve warm with a green salad or use as a side dish for steak, pork chops or chicken.


Monday, October 12, 2015

French Yogurt Cake

I've read about yogurt cake in beaucoup French books and memoirs. In Pamela Druckerman's Bringing Up Bébé: One American Mother Discovers the Wisdom of French Parenting, par exemple. And more recently in Elizabeth Bard's Lunch in Paris: A Love Story with Recipes. Both books make me a teensy bit wistful that I didn't pick up and move to the City of Light while in my 20s.

Anyhow, yogurt cake is a popular treat in France. It's often the first cake that les enfants learn to make and I can see why. No electric mixer needed. Most ingredients are always on hand. It's quick to put together, which means you don't have to wait long -- just a little over an hour really --- until you devour your slice. Of course, Mom or Dad should handle the lemon zesting.

French kids use the same 8 ounce yogurt cup to measure the sugar and flour. I couldn't find 8 ounce yogurt cups, so I bought a 24 ounce container, so Lucy, Penny and I could make this cake multiple times.

I adore this cake. It's quick. Simple. Sweet, but not too sweet. No icing required. Tastes even better the next day.

XOXO,
Amy


French Yogurt Cake
From Lunch in Paris: A Love Story with Recipes by Elizabeth Bard

1 cup plain, whole milk yogurt
1 cup sugar
A large pinch of sea salt
1 teaspoon vanilla
1/3 cup vegetable oil
2 large eggs
1 2/3 cups all-purpose flour
1 1/2 teaspoons baking powder
1 teaspoon baking soda
Zest of one lemon
One 16-ounce can apricots, drained and quartered (Note: My store had 8-ounce cans only, so I got two of those.)

Preheat oven to 350 degrees.
Lightly butter a 10-inch round cake pan and line with parchment paper.

In a medium bowl, combine the yogurt, sugar, salt and vanilla, stirring or whisking until smooth. Add oil in a steady stream, while whisking to combine. Add eggs one by one, whisking to combine after each one.

In smaller bowl, combine the flour, baking powder and baking soda. Add flour mixture little by little to the yogurt mixture, whisking along the way to combine. Stir in lemon zest. Pour cake mixture into prepared cake  pan. Top with chopped apricots.

Bake on center rack for 45 minutes, until golden brown and slightly risen; a toothpick inserted in the center should  come out clean.

Lift cake by parchment paper and place on wire rack to cool.

This cake is even better the second day -- provided it sticks around that long. It gets more moist as it sits.

Elizabeth Bard points out in her book that this cake is a "blank canvas" that you can  make  your own based on the fruits you like or have in your fridge at the time. Try fresh raspberries or pears sprinkled with brown sugar, she suggests.

My girls enjoyed this cake. They ate it several mornings for breakfast -- with a banana on the side, so no judgment. But they didn't love the apricots and asked that next time I try peaches instead, so that's what I did the second time around. I used canned peaches (in juices, not syrup), drained and chopped. I sprinkled some cinnamon over the peaches as I would when making a peach cobbler.

Verdict: The girls preferred the cake with peaches; I liked the apricot version better.

Bottom  line: This is a great go-to dessert for any day of the week. I plan to make it beaucoup times.

Friday, October 9, 2015

Crispy Apricot Mustard Chicken

With a new baby, I'm looking for easy meals that don't require a lot of hands-on prep time. Little Elaine is a very good baby...until it's time to make and eat dinner. Then she requires lots of holding and patting and shhhh-ing. And that doesn't take into account the three-year-old hanging from my leg, kindly begging me to crash Matchbox cars with him.

Today's recipe was born out of necessity—a hands-off meal using up ingredients in my fridge. Chicken breasts get a hint of sweetness from apricot preserves that's balanced with a tangy punch of mustard. The curry powder doesn't scream "I'm eating curry!" but rather lends a bit of "hmmm...not sure what this added pizzazz is, but I like it." With crunchy, buttery breadcrumbs to top it all off, it's a delightful dinner.

Want to make it a well-rounded meal? Serve Crispy Apricot Mustard Chicken with Buttered Egg Noodles and Sauteed Peas with Mushrooms.

Let's get cooking!
Erin


Crispy Apricot Mustard Chicken
Serves: 4

2 tablespoons apricot preserves
2 tablespoons honey mustard
1/4 teaspoon curry powder
Salt
Pepper
4 boneless, skinless chicken breasts
1 tablespoon butter, melted
1/4 cup bread crumbs

Preheat oven to 350 degrees. Grease a 9" x 13" baking dish and set aside.

In a small bowl combine apricot preserves, honey mustard, curry powder, 1/4 teaspoon salt, and 1/8 teaspoon pepper. Place chicken breasts in prepared baking dish. Schmear apricot-mustard mixture on top of chicken and then flip the chicken over a few times so it's coated on both sides. (At this point, you can cover the baking dish and refrigerate until you're ready to make dinner.)

In a separate bowl, combine butter, bread crumbs, 1/4 teaspoon salt, and 1/4 teaspoon pepper. Evenly sprinkle bread crumb mixture over chicken. Bake in preheated oven for about 30 minutes, until chicken reaches an internal temperature of 165 degrees. Allow to rest for 5 minutes before serving.


Wednesday, October 7, 2015

Herbed Egg Bake

We like to eat breakfast for dinner (brinner!) every now and then and I'm a big fan of egg bakes.

For the past few years I've been on a quest to achieve a quiche-like consistency without using heavy cream and a crust. After a recent visit from my parents — during which we ate many bagels topped with cream cheese and the smoked salmon they brought back from their Alaska excursion — my fridge was overflowing with tubs of cream cheese in several flavors (garden, onion and chive, etc.)

So I began experimenting with baked eggs again. I've tried whisking cream cheese into eggs before scrambling them or baking them, but could never quite get that fluffy custardy texture.

Until now. Thanks to Epicurious.com I know the trick: Mix the eggs and cream cheese together with milk in a blender.

This egg casserole is simple to prepare and also makes for a great brunch dish. The leftovers taste delicious cold or warmed in the microwave.

Mangia! Mangia!
Andrea


Herbed Egg Bake

2 cups shredded cheese (cheddar, Gruyere or Swiss work well)
1/2 cup chopped fresh herbs, such as chives, basil, parsley, oregano (Use one kind or a mixture)
10 large eggs
6 to 8 ounces cream cheese, plain or the flavor of your choice
1 and 1/2 cups milk
1 teaspoon ground pepper
1/2 teaspoon salt
1/4 to 1/2 teaspoon nutmeg

Preheat oven to 350 degrees. Butter or use cooking spray to coat a 13x9x2 inch pan or a 2 quart baking dish.

Spread cheese and herbs evenly over bottom of baking dish.

Crack eggs into blender. Add milk, cream cheese, pepper, salt and nutmeg. Pulse or blend until smooth.

Pour egg mixture over cheese and herbs in baking dish. Place in middle rack of oven.

Bake for 40 to 45 minutes, or until egg bake is lightly browned, puffed and set in the middle. Let cool for about 10 minutes before serving.


Monday, October 5, 2015

Cheater Crockpot Chicken Curry

My pantry is always stocked with secret sauces, not that I'm tight-lipped about them. You might recall my Easy Yellow Curry Shrimp Pasta. Busy moms need some short-cuts sometimes. Every mom needs a "cheater" dish or two. I'd direct you to Andrea's Slow Cooker Pork Tomatillo-Verde Tacos.

I'm a big fan of Trader Joe's bottled curry sauces -- the Thai Yellow Curry Sauce used in my shrimp pasta dish mentioned above and the Thai Red Curry Sauce used in my Cheater Crockpot Chicken Curry.

This is a go-to meal Chez George, especially in the colder months.

XOXO,
Amy


Cheater Crockpot Chicken Curry

6 frozen chicken breasts
1 pound carrots, peeled and trimmed, but left whole
1-2 onions, cut into big hunks
3-6 potatoes, red or sweet, cut into big hunks (I peel sweet potatoes, but not the red potatoes.)
2 bottles Trader Joe's Thai Red Curry Sauce (or Yellow Curry Sauce -- your preference!)
Jasmine rice, cooked according to package directions.


First note that in the above ingredient list, the quantities are subject to your preference and what you have on hand. I usually use just one kind of potato -- red or sweet. But this last time I happened to have both potatoes around. Anyhow, you cannot mess this up.

Add all ingredients, except the jasmine rice, to the crockpot. The frozen chicken should be on the bottom and the sauce is the last thing that you add. Cook on low for eight hours.

If you'd like to add frozen peas or fresh basil to your curry, toss those in about 15-20 minutes before serving.

Serve over rice. Enjoy the leftovers, too!

Friday, October 2, 2015

Seven Layer Bars

I first posted my recipe for Seven Layer Bars in 2010. They are one of my all-time favorite treats. Every time I make Seven Layer Bars, I wonder why I don't whip these babies up every week. Oh...I know. Because I would eat every. single. one. And that wouldn't be so great for fitting into my pants. ("Baby weight? No...this is Seven Layer Bar weight.") Studded with chocolate and butterscotch and gilded with the nectar of the gods that is sweetened condensed milk, I can't limit myself to just one. They are just so, so good.

Next time you need a treat for a bake sale, a potluck, or just a night on the couch with Netflix, make yourself a batch of Seven Layer Bars. You'll be glad you did.

Let's get cooking!
Erin


Seven Layer Bars
Originally posted October 2010

1 1/2 cups graham cracker crumbs
1/2 cup butter
1 heaping cup chopped pecans
1 heaping cup chocolate chips
1 heaping cup butterscotch chips
1 3/4 cups sweetened flaked coconut
1 (14 ounce) can sweetened condensed milk

Preheat oven to 350 degrees. Grease a 9" x 13" baking dish and set aside.

In a small bowl, combine graham cracker crumbs and butter. Press evenly into the bottom of the prepared baking dish to form a crust. Sprinkle pecans over the crust. Top with chocolate chips and butterscotch chips. Sprinkle coconut on top of that. Finally, drizzle sweetened condensed milk over the coconut. (I find it helps to avoid drizzling the sweetened condensed milk around the very edges of the pan. The condensed milk can bake onto the edges of the pan, and this makes it really sticky and tough to get out of the pan.)

Bake in preheated oven for about 20 minutes, until the coconut is light golden brown. Cool, then slice into bars.