Showing posts sorted by relevance for query meatballs. Sort by date Show all posts

Wednesday, March 25, 2015

Traditional Italian Meatballs

Meatballs – easy to make and easy to use. And oh so easy to eat. Pop a few on top of spaghetti or pizza, bake some into a lasagna or cover them in cheese inside a warm submarine roll.

Meatball subs are exactly what my family eats on frenetic nights when we are rushing from after school meetings, to sports practices to church activities and somehow need to sandwich (pun intended) in a quick and tasty meal.

One thing I love about making meatballs is that my boys can help. They get a kick out of rolling the meat mixture into golf ball-sized yumminess. My youngest, Sam, helped me with our latest batch. Meatballs freeze well, too. After one recent Christmas, my freezer was stocked-full for months with the dozens of meatballs left from the 90(!!) prepared by my Mom and Grampy.

So make a double batch and store some for later. When you need a fast meal, warm in the microwave, in the oven or in a pot of your favorite tomato sauce.

This is my family's traditional Italian meatball recipe, with one slight change. My Mom uses 1 cup of breadcrumbs for every 1 pound of meat. Too bready for me, so I use fewer breadcrumbs. Feel free to add your own touches here by using ground turkey or chicken, adding chopped onion, experimenting with different seasonings or swapping out some of the dry herbs for fresh herbs you have on hand.

Meatballs are very forgiving and fun – and that's the point!

Mangia! Mangia!
Andrea


Traditional Italian Meatballs & Meatball Subs

1 pound ground beef
1 pound ground pork
1 pound ground veal (you can replace with beef or pork)
4 eggs
1 1/2 to 3 cups Italian seasoned bread crumbs
1 tablespoon dried parsley
1 tablespoon dried oregano
1 tablespoon dried basil
2 tablespoons garlic powder
Salt and pepper to taste

Preheat over to 350 degrees. Place meat in large bowl and make a well in the center. Add all other ingredients into the well and mix thoroughly. I recommend using your hands. The consistency should not be too wet or too dry.


Form large or small meatballs and place in foil pans or pans lined with aluminum foil. This is where the kids can help. If you make the meatballs the size of a golf ball you should get about 36.

Bake for 30 to 40 minutes, or longer if your meatballs are larger.

If you plan to serve these meatballs with tomato sauce, let them simmer in the sauce for a bit before eating. This nicely flavors both the sauce and the meatballs.


Meatball Subs

4 submarine or hoagie buns or a large baguette (a softer bread works a little better here)
3 to 4 golf ball-sized meatballs per sandwich
Tomato sauce
Sliced or shredded provolone and/or mozzarella cheese

Preheat oven to 400 degrees. Slice buns lengthwise. Scoop out some of the inner breading to make a pocket for the meatballs.

Place buns on cookie sheet. Put 3 to 4 meatballs and some sauce inside each bun. Top with cheese.

Toast sandwiches in oven until cheese melts. Enjoy with a green salad.


Wednesday, May 13, 2015

Family Lasagna

If you've made our Sunday gravy and traditional Italian meatballs, then roll up your sleeves, because you are ready to tackle old-fashioned, Old World lasagna.

Fear not — if you mastered the tomato sauce and meatballs, you're practically Italian already!

I call this "family lasagna" for two reasons: It's more than enough to feed a crowd of relatives (or friends) and you can put everyone to work helping you make it. The process might seem a bit much, but I remember having lots of fun as a kid, sitting around the kitchen table with my parents, my siblings and sometimes my grandparents, chopping meatballs and sausage and mixing up the ricotta cheese filling before building the lasagna.

Yes, there are many short cuts, like using no-boil lasagna noodles or cooking ground beef with some Italian seasonings instead of making meatballs. But trust me. I've made lasagna the quick way numerous times. The final result just can't compare to the real thing.

Mangia! Mangia!
Andrea


Family Meat Lasagna

20 wavy lasagna noodles (usually 1 and 1/2 boxes)
1 tablespoon olive oil
2 (15 ounce) containers of ricotta cheese
5 cups shredded mozzarella cheese, divided
1 1/2 cups shredded parmesan cheese, divided
2 eggs
1 teaspoon salt
1 teaspoon pepper
6 cups or more of homemade tomato sauce
1 1/2 cups cooked meatballs, chopped
1 1/2 cups cooked Italian sausage links, chopped (mild, sweet or hot)

Preheat over to 375 degrees. Cook lasagna noodles according to package directions, adding 1 tablespoon olive oil to water to prevent sticking. After draining noodles, place them on parchment paper.

While lasagna noodles are cooking, mix together ricotta, parmesan cheese, eggs, salt and pepper.

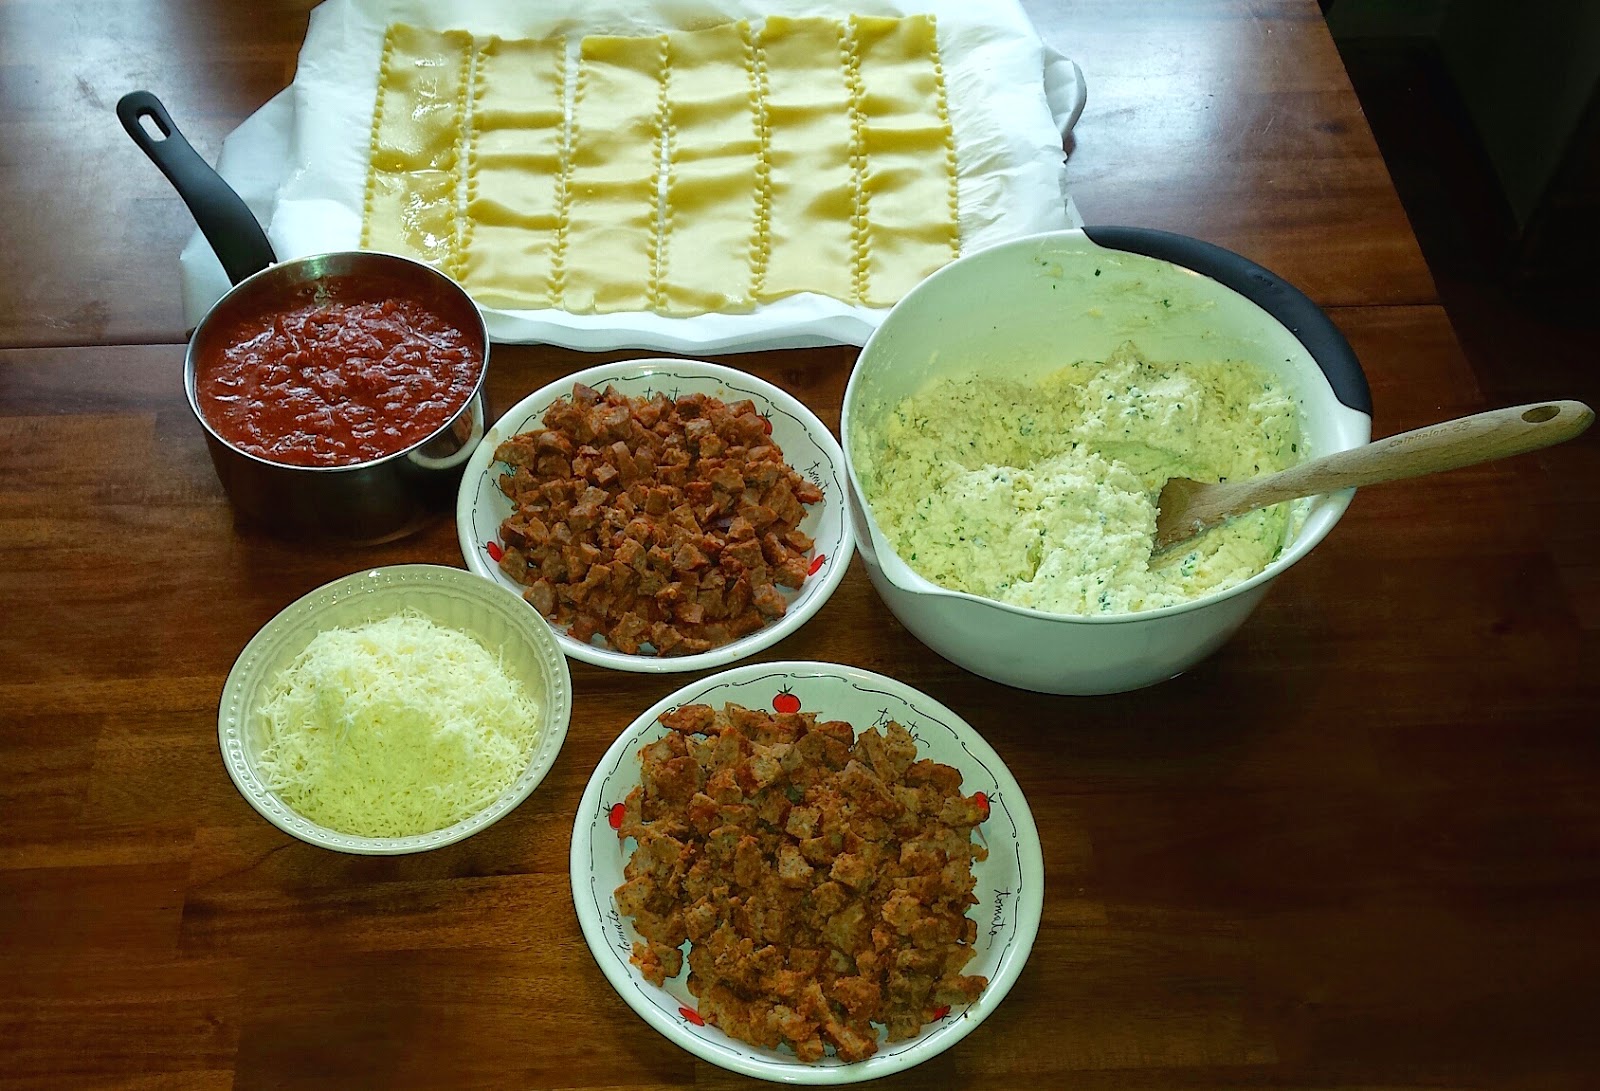
Set up a lasagna prep station, with all ingredients in easy reach.


Cover bottom of a deep 13 x 9 inch casserole dish with 1 cup tomato sauce. Layer 5 lasagna noodles on top, slightly overlapping them.


Top noodles with 1 cup ricotta mixture, 1/2 cup chopped meatballs and 1/2 cup chopped sausage. Top with 1 cup shredded mozzarella and 1 scant cup tomato sauce.


Layer another 5 noodles on top of first meat and cheese layer. Repeat the cheese, meat, mozzarella and tomato sauce layering two more times. Top final noodle layer with tomato sauce, ensuring that corners are covered with sauce. Sprinkle remaining 1 cup of mozzarella cheese and 1/2 cup of parmesan cheese on top.

Cover lasagna with foil lightly sprayed with cooking spray. Bake in 375 degree oven for 45 minutes. Remove foil and cook for 15 minutes more. Lasagna is done when it is bubbly.

Depending on your oven, it can take as long as 90 minutes to cook. You can also bump up the temperature to 400 degrees — just check the lasagna more frequently.

Remove from oven and let lasagna sit for about 15 minutes. Then slice and serve.

**Note on make-ahead preparation: You can prepare the lasagna the night before. Just refrigerate and bake within 24 hours.

**Note on freezing lasagna: If you plan to freeze an entire lasagna, it's best to freeze before cooking. Thaw, then cook as directed above.


Wednesday, April 15, 2015

Sunday Gravy (Tortora family tomato sauce)

Confession time. I rarely make my own tomato sauce – or 'gravy' as us East Coast Italians call it – because it takes time to develop the deep, rich flavor that is its signature.

When I was a kid, my grandmothers made gravy nearly every Sunday, to go with the 'macaroni' we were having at that week's family gathering. When Amy asked for the Tortora tomato sauce recipe, I finally put it down on paper. In the process, I discovered many family variations: My brother adds grated carrot for sweetness. My Dad pours in some red wine. My mom tosses in a pinch of thyme and maybe a dash of sugar. My Grammy Marie always spiced it up with lots of red pepper.

The one component no one ever changes is what makes this gravy special. The tomato sauce simmers for hours with browned Italian sausage links and homemade meatballs. For special occasions such as Christmas, browned beef short ribs and brachiole (thin slices of beef rolled with parmesan cheese, parsley and basil, and tied with kitchen twine) are added.

Prefer chicken? Do what my Grandma Lucy sometimes did: Brown some chicken breasts and thighs and add them to the sauce instead of meatballs and sausage.

Vegetarian? Simply skip the meat.

If you happen to overdue it on one of the spices, as I may or may not have done recently with the red pepper flakes, fear not! Just toss in another can of tomatoes (crushed, diced or sauce) to dilute the strong flavor. You will be rewarded with extra gravy to use for making lasagna or another meal.

Finally, a warning: This recipe makes A LOT of tomato sauce. I use a 22 quart pot. This ensures plenty of room for the meatballs and sausage. If you don't have a pot this large, cut the recipe in half.

My recommendation? Buy or borrow a giant pot, invite your friends and family to dinner and make room in your freezer.

Mangia! Mangia!
Andrea


Sunday Gravy

1 or 2 tablespoons olive oil to cover the bottom of a large pot
About 2 cups diced yellow or white onion
3 to 5 minced garlic gloves
1 tablespoon dried oregano
1 tablespoon dried basil
1 tablespoon dried parsley
1/2 to 1 teaspoon red pepper flakes
1 to 2 teaspoons garlic powder
1 teaspoon salt
1 teaspoon pepper
2 (6 ounce) cans of tomato paste
3 (28 ounce) cans of crushed tomatoes
2 (14.5 ounce) cans of diced tomatoes
1 (14.5 ounce) can of unseasoned tomato sauce
1 (8 ounce) can of unseasoned tomato sauce
1 cup dry red wine, optional
12 or more large cooked meatballs, optional
1 or 2 pounds of browned or baked Italian sausage links, optional

Warm oil in bottom of pot. Add onion and garlic and cook until onion is translucent. Add in spices and salt and pepper and cook until golden, about 1 to 2 minutes. Add tomato paste and stir, cooking until mixture is caramelized. Taking the time to brown the aromatics gives the gravy a richer flavor.

Stir in all cans of tomatoes and tomato sauce. (Note: You can vary the types of tomatoes you use. For example, if you like a chunkier sauce, substitute diced tomatoes for the canned tomato sauce.) Add red wine, if using.

Bring gravy to a boil, stirring occasionally. Lower heat and let simmer for about 20 minutes, stirring a few times. Add meatballs, sausage, etc., and continue to simmer on lowest setting for at least 1 hour but preferably more (you can simmer it all day,) stirring occasionally to prevent sauce from burning in the bottom of the pot.

I recommend tasting the gravy here and there. It's OK to add in more spices as the sauce simmers to achieve the flavor you prefer.

Serve hot with your favorite pasta.


Saturday, November 12, 2016

Saturday Shout-Out — Prep Freeze Cook

When life gets busy, I often joke that I need a personal assistant — or a wife.

Wouldn't it be nice to have someone do the laundry and cook a few meals when us busy moms get even busier?

I haven't been cooking much lately, but I have been able to put some yummy meals on the table thanks to a local shop called Prep Freeze Cook. This gem of a store lets you purchase pre-made, frozen meals that you can pop in the oven or the crockpot whenever you need them.

When my boys were little and I was working full-time in Cincinnati, I frequented a similar outlet called Dream Dinners.

The beauty of these meal preparation shops is that you can add your own special touch to each entree. And when you find a dish the whole family loves, you've got a new recipe to add to your rotation.

I love the chance to try out new meals that I might not normally make at home. It's a great way to get my brain working on new recipes to test in my own kitchen.

So I thought I'd share a few of the Prep Freeze Cook meals my family likes.

Do you frequent a meal assistant shop or use one of the many online offerings? I'd love to learn about some of your favorites, too.

Mangia! Mangia!
Andrea


Zuppa Toscana: This Italian soup features sausage and beans for a hearty, flavorful meal. Pair it with some crusty bread and dinner is served.


Taco Casserole: This is almost like a zesty, thick chili. We added shredded cheddar cheese and sliced green onions on top.


Chicken Chili: This white chili is so delicious. All we added was some fresh ground black pepper and cilantro.


Sweet & Sour Meatballs: These tangy meatballs were a big hit with my boys, one of whom choose to stuff them into a hot dog bun instead of eating them over rice.

Monday, March 14, 2016

Amy's Yummy Year

This time last year, my friend Erin invited my friend Andrea and I join her on this delicious blog she created. Andrea and I bellied right up. Thank you, Erin for the creative culinary outlet. It's been a sweet year blogging with two awesome foodie friends who share the goal of putting food on the table and keeping the tradition of family dinner alive.

Here are some of my happiest Hot Dinner Happy Home moments from the past year as well as some of my favorite dishes by Andrea and Erin.

Enjoy!

XOXO,
Amy

Happiest Moments

  • Creating Spring on Toast with Erin while my Lucy and Penny "babysat" her Danny-boy. (Love that Erin shared this memory in her Friday post.)


Favorite dishes by Andrea


Favorite dishes by Erin

  • Erin's Slow Cooker Thai Peanut Pork is the first HDHH dish I ever made and I chatted it up A LOT on my Facebook page. I couldn't even tell you how many friends have made that dish. Suffice to say it's a hit from coast to coast and all points in between.
  • Parmesan and Yogurt Crusted Chicken is a George family go-to dinner. My younger daughter Penny requested it for her birthday dinner last month.
  • I see Spiced Pecans becoming my go-to holiday party nosh. I didn't make them last year like I intended. But in 2014 my friends walked off with the few remaining nuts after the Thanksgiving feast Chez George. I don't blame them, because, after all, we call these crack nuts.

Tuesday, December 22, 2015

Andrea's Christmas Antipasto

We're spending Christmas in Cincinnati with my husband's family, whose holiday meal tradition is that dinner is different each time! This year, our big meal will be a turkey dinner on Christmas Eve, as some of our group will depart Christmas Day to visit other family members.

On the Tortora side, Christmas Day means raviolis with homemade tomato sauce and meatballs, and hot and mild Italian sausage. The meal always begins with an antipasto. This is a huge platter of salami, ham, prosciutto and other cured meats like capicola, plus provolone and mozzarella cheeses, assorted olives, pickled mushrooms and eggplant and stuffed hot peppers. Roasted garlic cloves, Italian bread and focacia round out the spread.

The appetizer is much like a charcuterie board. It's a great dish to serve at parties, especially during the holiday season. And you might be surprised at how much the kids enjoy it, too.

Last Christmas during our antipasto course, we discovered how much Sam enjoyed proscuitto, which he calls "thin meat." For weeks afterward he requested prosciutto sandwiches in his lunch box. Sam's love of this cured ham was re-ignited when he met this gorgeous platter at a gathering hosted by his Aunt Karen (who also took this photo.)


Karen's neighbor Kim crafted this masterpiece, and I'm planning to re-create it this week. Kim was thrilled that Sam and Karen's nephew Harrison were willing to try out the different combinations of meat and cheese. Here's Kim, sharing her foodie knowledge with newbies Sam (in orange) and Harrison:


The big surprise came when Sam consumed all of the proscuitto, all by himself. Luckily, Kim was a good sport, noting that at least the meats were domestic and not imported!

If you want to go all out, do get some Proscuitto di Parma for your table. It's definitely worth spending a little extra to try the real thing. Need tips on crafting the perfect charcuterie board? Click here. And if you enjoy beautiful charcuterie photos, check out In Parma by Food Roots on the web or follow the London restaurant: @inparma.

Merry Christmas and Mangia! Mangia!
--Andrea

P.S. Here's a shot of my family from last night as we enjoyed some Christmas decorations.


Monday, February 5, 2018

Brian's Blackberry Jam Cake With Caramel Icing

Friday was a momentous day in the George family as it marked our last single-digit human birthday. Penny turned 9. It should be noted that doggie Ellie will turn 1 in May.

We celebrated all weekend with food — duck curry at a favorite Thai restaurant on Friday, homemade meatballs and sauce on Saturday, slow cooker Philly cheesesteaks on Super Bowl Sunday. And for dessert: blackberry jam cake with caramel icing.

I'd never heard of a jam cake before, but was intrigued when I saw my friend and former newspaper colleague Brian post about it on Facebook.

Brian's husband was grew up eating jam cakes in Kentucky. But Brian had never heard of them before either. Brian grew up in Virginia, and I'm from Ohio. I found a Southern Living story that explains that this dessert originated in Appalachia when store-bought sugar was scarce and jam was used to sweeten cakes.

Now because I'd never had or seen a jam cake before, I didn't realize that the icing was supposed to be spread all over the cake. Because the cake is to be baked in a tube pan — like angel food cake — I was picturing icing more as a glaze. Consider the picture of my finished cake.


And now Brian's finished cake.


Brian's is prettier, no doubt. But happy to report mine still tasted amazing. Subtly spiced. Not sickeningly sweet despite all the sugar and jam. Even the kids loved it. (Although, Lucy wants me to leave out the raisins next time.)

Y'all try this cake!

XOXO,
Amy

Brian's Blackberry Jam Cake
2 cups white sugar
1 cup butter
4 eggs
1 cup buttermilk
3 1/2 cups flour
1/2 teaspoon salt
1 teaspoon baking soda
2 teaspoons baking powder
1 teaspoon cinnamon
1 teaspoon allspice
3 tablespoons cocoa
1 pint blackberry jam
1 cup raisins
1 cup chopped pecans

Preheat oven to 350 degrees.

In a large mixing bowl, cream together sugar and butter. Slow add eggs, one at a time, beating well after each addition. Then, add buttermilk.

In another bowl, sift together flour, salt, soda, baking powder, cinnamon, allspice and cocoa. Add this to the sugar-egg-buttermilk mixture and mix well. Add blackberry jam and combine. Place raisins and nuts in a small bowl and coat with a small amount of flour; add to mixture.

Grease and flour a tube pan. Pour cake batter into pan. Cover pan with a stoneware plate. Place a pan of hot water on the bottom rack in the oven, so the cake will steam as it bakes. Bake for 1 to 1 1/2 hours, until a straw inserted in the center comes out clean. Frost with caramel icing.


Caramel Icing
1 1-pound box of light brown sugar
1 stick butter
1 cup milk

Combine ingredients in a saucepan. Cook until the soft ball* stage. Beat with an electric mixer until thick. If it gets too thick, add a few drops of milk and stir.

*Soft ball stage is candy-making lingo for 235 degrees, and it will be a major marking on any candy thermometer, Brian explained when I asked. He added: If you don't have a candy thermometer, "the test is something like `drop a little into water. If it forms a soft ball (as opposed to a hard ball, hard crack, etc.), you're good to go."

More from Brian: "Because the temperature is so important, making jam cake frosting is among the more complicated things I do. It will probably take longer than you'd expect for it to reach temperature. But it's really good—sweet but sophisticated, not like Betty Crocker glucose goo." (Sorry, Betty.)